Creating events on Ticketor is fast and easy. To add your event use the "Control Panel > Events & Venues > Events" and click on the New Event button. Alternatively, you can click on the Add Event button on your home page.
;
Later on, to edit your event use the "Control Panel > Events & Venues > Events". Find the event in the list, and click on the icon to edit the event. Alternatively, as a shortcut, if the event is showing up on your home page, you can hover your mouse over the event and use the "Edit Event" link.
There is a Walk through that pops up and guides you through the steps. Make sure to use it. You can always open the walk-through from the right side of the screen. To complete the event, use the walk-through or continue reading.
COVID-19 Notes:
After reviewing this section about creating an event, you can checkout Tips on Creating an Online Event and Tips on Creating Events with Safe Distancing Due to COVID-19
Steps to Create Events
- Enter the event details and optional pictures or videos.
- Choose, create, or find a venue.
- For reserved / assigned seating, design, copy, or verify the venue seating chart.
- Create price levels and optional price variations.
- For reserved / assigned seating, add tickets to seats, rows, tables, or sections on the seating chart.
Venues and seating charts are reusable and separate from events. Pricing is set on the event, not on the venue.
Use the guided wizard for a simple setup, or switch to the full editor when you need every option. Save as you go, then share the event link when the setup is complete.
Information Tab
Start with the event name buyers will see, then choose the event format, venue, date and sale window.
Event Format
Choose how buyers attend and how seats are sold:
- General admission / Open Admission(GA): Use this when tickets do not have assigned seat numbers. You can still sell sections, standing room, VIP, early bird, or other price levels.
- Reserved / assigned seating: Use this when buyers choose seats, rows, tables, or sections on a seating chart. Choose this even when only part of the event is assigned seating and another part is GA.
- Online event: Live or streaming. Attendees join online.
Venue
A venue is where your event happens, in person or online. It can include a seating chart for assigned seating, but it does not have to. You can reuse the same venue for multiple events.
Choose one of your venues, create the venue easily, or search venues across the platform and Google Maps. If you copy a venue or seating chart from another organizer, preview it and verify all details before selling tickets.
For each venue, review the:
- Venue's name
- Address or URL: used for directions and ticket details
- Time zone: used for event time and the sale window
Date / Time
Set when the event starts and how long it lasts. The duration is also used for recurring events and calendar listings.
All times use the venue time zone, so verify the venue time zone before saving.
Sale Window
The sale window controls when buyers can buy tickets. You can use exact dates or relative times, such as starting sales a certain number of days before the event and ending sales two hours after each event instance starts.
For recurring events, relative sale windows are calculated for each instance.
Activate:
Active enables or disables the event for everyone. Private keeps the event hidden from public lists while still allowing direct admin access.
Save
Save your changes before previewing, sharing, or testing the buyer page.
Delivery & Return Tab
Choose how buyers receive tickets and set the return policy for this event.
Delivery Methods
Select the delivery methods you want to offer. Common options are:
- Will-call: buyers pick up tickets at the venue or another pickup location.
- E-ticket: buyers print the ticket or show it on their phone.
You can also offer mail, local pickup, or other custom delivery methods, and you can charge a fee when needed.
e-Tickets
E-tickets are emailed after purchase. Buyers can print them or show them on a phone.
e-Tickets are secured using a hard-to-generate code that is printed on each e-ticket. It is printed in QR code format, barcode format and human readable digits. At the gate, tickets should be validated to make sure they are valid and they are not duplicate (not being used more than once). Check out Control Panel > Help & Support > Help & Instructions > Gate Control & E-Ticket Validation for more information.
Will-Call (Venue Pickup)
Use will-call when buyers should pick up tickets at the venue, box office, or another pickup location.
If will-call is offered as the delivery method, you should be prepared to deliver the will-call tickets. Check out Control Panel > Help & Support > Help & Instructions >Ticket Delivery & Delivery Options for more information.
Mail
You can also offer delivery by mail. You can consult the post office or any mailing service to find the proper mailing options. You will get an email anytime a customer purchases tickets that require shipping and you are responsible for printing and mailing out the tickets. Check out Control Panel > Help & Support > Help & Instructions >Ticket Delivery & Delivery Options for more information.
Returns Policy
Set whether returns are allowed, how long before the event they are allowed, and any return fee.
Pictures & Videos
Upload the event flyer, venue or seating chart images, and YouTube or Facebook videos.
All pictures should be in jpg, gif or png format.
Tickets
Choose the e-ticket or badge design, preview a sample, and refresh the preview after saving changes.
Use the ticket designer only when you need a custom ticket or badge layout.
Add / Update Tickets
Define your pricing with price levels and optional price variations. For assigned seating, add tickets to the seats or sections on the seating chart.
If the event needs assigned seating and the venue does not have a seating chart yet, design or copy the chart before adding tickets.
Details & Questions
Add the public description, checkout questions, categories, organizer, and other advanced options.
Organizer:
Select an organizer when another person or organization should receive event sale notifications or access reports.
Check out Control Panel > Help & Support > Help & Instructions > Users with special permission: Administrators, Reporter Generators, Event Organizers, Sales Agents & Gate Controllers on how to add new organizers.
Questions to be Asked
Add any questions buyers must answer before checkout, then reorder them in the order buyers should see them. Check out Control Panel > Help & Support > Help & Instructions > Question Manager (Asking questions from buyers) to create and manage reusable questions.
Promote
When your event is complete, share the buyer link, download or customize QR codes, send emails, or create trackable links. A trackable link is a link for a promoter, channel, post, or campaign so sales from that link can be reported by source.
Creating online event is very similar to creating a regular event with some minor differences.
Ticketor supports both 'Live' and 'On-Demand' streaming events.
Click here to learn about Creating an event on Ticketor
Online events
Online events can be performed through a variety of conferencing or streaming tools including Facebook, YouTube, Vimeo, Zoom, Wistia, etc.. The attendee needs to click on a link to join the event and optionally they may need a password or special instruction.
When creating the venue, you can set the venue name to something like 'Online', 'Online through [your provider name]'
Admission
You have 2 options for controlling the admission and making sure only people with a ticket can attend.
1- Admission On Ticketor (Preferred)
Whether you are planning a 'Live' event or an 'On-demand' one, Ticketor will take care of the admission and ticket validation so you can easily monetize your events or videos.
Choose the option to Stream on Ticketor, then get the embed code from your streaming provider and add it to your event. A 'Watch Here' link will be added to your tickets and confirmation emails and the buyer can click on the link, enter the code on their ticket and the system will validate the ticket and upon validation, admit them to the page with your embedded video.
Hints
• For on-demand videos, set the duration of the event to all the time that the video is available for watching.
• To secure your video and making sure that a user cannot share the video after they get admitted, there are certain actions that you can take.
In your streaming provider, choose the option that the video can only be watched when it is embedded in certain domain, in this case: ticketor.com
• You have the option to allow 'Exit for re-entry' or not allow it.
If exit for re-entry is allowed, the buyer can click on a button to leave the event and they can re-enter from the same device or another one by re-entering their ticket code, otherwise they have to watch the full event on the same device.
In either case, if the viewer's computer dies or becomes inaccessible, the admin can use the Gate Control page or app to enter the buyer's ticket code in 'Exit mode' (un-scan the ticket), so the buyer can use the ticket again on a different computer.
Where to upload the videos?
While you can technically use any streaming providers, it is important that your streaming provider have the security feature to restrict the video to only be viewable when it is embedded in your site. Meaning that the video is not watchable from the streaming provider site for public and it is not sharable through a link.
Wistia offers good video restriction and a free plan. Upload your video to Wistia, set the project to 'Locked' as explained here, then follow the instruction here to enable 'Domain Restriction' and restrict the video only to ticketor.com .
Vimeo PRO or Vimeo Business also offer domain restriction. After uploading your video, set your Vimeo privacy settings by following the instruction here and make sure to enable the 'Only on sites I choose' embedding option and restrict the video embedding only to ticketor.com .
YouTube offers domain restriction only to Content Manager users. Follow the instruction here and restrict the video embedding only to ticketor.com .
Other Streaming Providers
You should contact the streaming provider to make sure they have feature to restrict the video, so it is only viewable when it is embedded in certain domain.
2- Manual Admission
Set the venue address to the link (URL) to join the event or leave the address empty if you prefer not to reveal the URL before the purchase.
You may get a warning that the system could not find the address. You can ignore the warning.
To reveal the link or any other instruction after the purchase is complete, from the 'Details tab' add it to 'After purchase notes' box. The content of this box will be shown to the buyer after the purchase is completed.
If you prefer to reveal the URL at a later time, maybe last-minute on the event date, you can use the Control Panel > Events & Venues > Mailing List feature and send an email to all the buyers. On the 'Send Tab' select 'Send to customers who have purchased tickets to the selected event'
If your streaming / conferencing provider can accept attendees email or a password, you can use Control Panel > Reports > Admission List Detail to export the attendee list.
Each purchase has a unique 'Confirmation Number'. Each ticket has a unique barcode number. You can use this data as the username or password for the attendees to log in.
Please note that a purchase may have several tickets and so all those tickets will have the same confirmation number and email associated with them but each ticket will get a unique barcode number.
If you need to get individual attendees email address or ask the each attendee to select a username or a password, you can follow Control Panel > Help & Support > Help & Instructions > Question Manager (Asking questions from buyers)
Optionally you can create a delivery method from Control Panel > Account & Settings > Delivery Methods for online events with proper name and description and use it in your event instead of the e-ticket or will-call options.
Example: Creating a ticketed event on Facebook
Note: The below technique can be used with other social networks, streaming or conferencing sites.
Create a private Facebook group for your event.
Set the group in a way that you have to approve every new member and that the new members should answer the following question:
- Purchase your ticket from [your Ticketor address] and enter the barcode number that appears on your ticket, here:
Create your event on your Ticketor site, set the venue address to the Facebook Group URL and instruct the buyers to join the group as soon as their purchase is complete so you have plenty of time to validate the barcodes and admit the attendees to the group.
To admit people to the group, go to the gate control page of your website, copy and paste the barcodes entered by attendees to the gate control's barcode box. If the barcode is accepted, add the user to the group.
At the time of the event, start a live stream to the group.
PS: You can leverage this opportunity to get more followers for your social network
This blog and video show you how to how to create ticketed online event (live streaming or on-demand) or monetize your videos:
How to create ticketed online event (live streaming or on-demand) or monetize your videos
If your event is general admission, you can skip this section. However, if your event or part of the event is assigned seat, you need to create a seating chart for your venue.
Go to Control Panel > Events & Venues > Venues. You should see your venue in the list. Click on the icon for the venue to go to the "Seating chart designer" page.
There is a Walk-through that pops up and guides you through the steps. Make sure to use it. You can always open the walk-through from the right side of the screen. Use the walk-through or continue reading.
The point of creating the interactive seating chart is to allow the buyer to select their seat or table on the interactive seating chart when buying tickets.
You probably have the seating chart on paper or in mind.
Important notes:
1- The venue and the seating chart should be re-usable by different events. So when creating the seating chart, do not think about the pricing or colors of the seats. They will be determined at the next step, when you create the event and add tickets to the chart.
2- The point of seating chart is to give the buyer an idea on where they are going to seat. It is not meant to match exactly what you have on paper or what is actually on the ground.
3- All changes to the seating chart are auto-saved. There is no need for explicit saving.
Seating chart components:
A seating chart is made of different components:
- 1- Sections: an amphitheater style chart is made of sections that contain rows and each row contains seats.
- 2- Tables (without seat number): could be in different shapes (round, square, corner) and different sizes (8 person, 10 person, etc.). Buyer can select the table but not individual seats. You should use this option if the seats are not numbered or the seats are not fixed and people may be able to move the seats around. Otherwise, if the seats are fixed and are numbered, use the "tables with seat numbers" instead.
- 3- General admission sections: Could be a standing area in the venue or a seated area that is based on first-come-first-serve. General admission sections can be used to create general admission sections or areas in an assigned seat event.
- 4- Tables with seat numbers or individual seats: Are a group of individual seats with an optional shape object (table). You can move around each individual seat or the table itself. You can use them to create scattered seats in the venue or use it with a shape (table) to create tables that the buyer can select individual seats on. Each seat and the optional shape can be moved individually and the shape can be resized.
- 5- Shapes: Could be used to show other areas of the venue such as the stage, bars, dance floor, etc.
You can add any of the above components to your seating chart.
Section, Row, Seat:
Most venues including amphitheaters and arenas consist of "Sections". In such venues, each seat is identified by section name, row name and seat number.
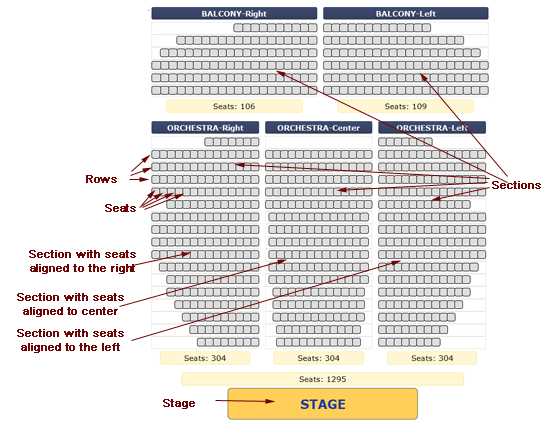
Stage at the Bottom
If you are designing an amphitheater, it is easier if you rotate your paper seating chart to have the stage at the bottom and then design the chart. After the design is complete, you can rotate the chart.
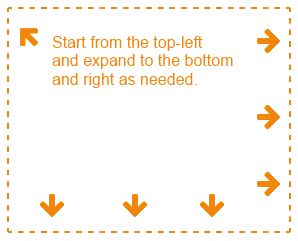
Seating Chart Designer Area
The area with the dotted border is the seating chart designer area.
It can expand to the right and bottom as much as you need.
So start by adding sections from the top-left and expand to the bottom and right as needed to make sure you don't run out of space.
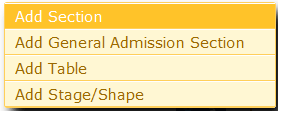
Add an Object to the Chart
Click anywhere in the area with the dotted border to add an object (Section, General Admission Section, Table or Shape) to your seating chart.
Section Properties
After adding an object to the chart, a window pops up and asks about the section properties which may vary based on the object type. Hover your mouse over the icon for more information about each field.
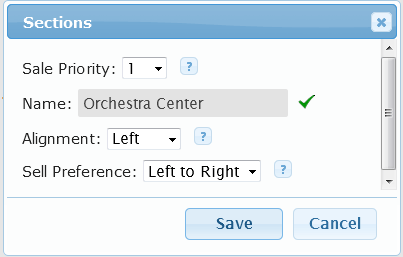
What does "Sales Priority" mean?
Buyers can select their seat on the seating chart. However, alternatively, they can ask the system to find them the best available seat for the price they have selected.
How does the system determine the best available seat? Here is where the sales priority comes to the picture. The system assumes that the sections with lower sales priority are the better sections.
Make sure to set the sales priority so that the best sections in the venue have the sales priority of 1 and as you get farther from the stage, the sections get bigger sales priorities.
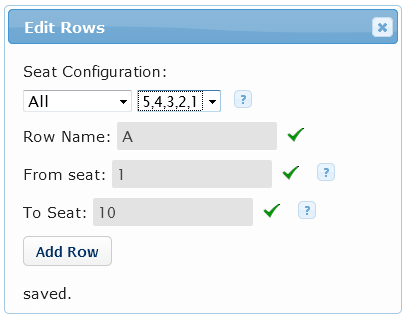
Adding Rows
If you add a section, then the next step is to add rows. Click on the 'Add row' link in the section to open the 'Edit Rows' pop up.
Important note: Always start by adding the closest row to the stage (usually row A or 1) and then proceed to next rows.
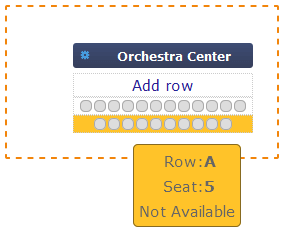
Verify Rows
After adding the first row in the section, always verify by hovering your mouse over the seats to make sure they are in the correct order and alignment before you proceed with the rest of the rows.
Edit Rows or Add the Missing Rows
Made a mistake in row properties? Or did you miss a row? Click on the row to edit it or insert the missing row below it.
Edit / Delete / Mark as Accessible / Mark as Restricted View / Add Space to the Left or Right of a Seat
Click on any seat in a section to open the 'Edit Seat' window where you can manage individual seats.
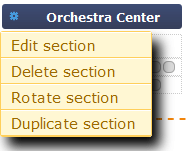
Edit, Delete, Rotate or Duplicate Sections
Click on the to edit, delete or rotate the section. Have similar sections? Duplicate the section and edit the properties. Duplication is really helpful for table events to create tables at exactly same size.
Move Sections
Drag and drop the section to move them around.
Adjust the seating chart
This step should be done after your seating chart is complete. Using the slider at the top-right, zoom the seating chart in or out to make it best fit on the screen. Also, use the rotate icon to rotate the chart.
Hide section details: For larger venues, usually with over 6000 seats, it may look better and work faster to make the seating chart to hide the section details. The buyer clicks on a section and the details (row and seats) open up in a bigger window.

Your Seating Chart is Ready!
Your seating chart is now ready! Now you can go to the Add/Update Tickets page to add tickets to the chart.
Watch the video below on creating a complex amphi-theater style seating chart:
After creating the event, add price levels, optional price variations, and ticket inventory.
Open the Tickets tab in the event editor, or go to "Control Panel > Events & Venues > Events" and click the ticket icon . If the event appears on your home page, you can also use the Add/Update Tickets link there.
The page changes based on the event format. General admission (GA) events use capacities. Reserved / assigned seating events use the venue seating chart.
Use the walk-through for step-by-step guidance, or continue below for the main concepts.
Add/Update Tickets Page for General Admission Events
For a general admission (GA) event, create price levels and set the capacity for each one.
Price Level vs. Price Variation
These two terms are used throughout the event, season, package, and ticket setup pages.
- Price level: The main price or inventory bucket, such as General, VIP, Balcony, or Adult. For GA events, a price level can have its own capacity.
- Price variation: An optional price under a price level that shares the same inventory. Use variations for senior, child, early bird, group pricing, or ticket-plus-add-on options.
Add Price Levels
Click Add a Price Level. Enter a clear name, optional description, color, face price, service charge, sale window, capacity, and purchase rules.
Examples of names are General, Standing, Balcony, VIP, Adult, Student, or Early Bird. Examples of descriptions are "student ID required" or "includes two drinks".
By default, a price level uses the event sale window. Set a custom sale window only when that price needs a different schedule, such as early bird or door pricing.
Use Advanced rules for minimum quantity, maximum quantity, or quantity steps. This supports minimum group purchases, fixed group sizes, pairs, family tickets, and whole-table sales.
Use the matching code field on price levels and price variations when you need other features to target a ticket type, such as coupons, newsletter recipient filters, or per-ticket checkout questions. Matching-code filters accept one or more comma-separated fragments and match by case-insensitive contains, so VIP can match VIP, KidsVIP, or SeniorVIP.
Save the price level to close the popup.
List of Price Levels
The price level is added to the list. You can edit it, delete it, or add price variations.
You can edit a price level after sales start. Price, color, sale window, and purchase rules apply to tickets using that price level.
Add/Manage Price Variations
Add a price variation when the same inventory needs another price or label, such as senior, child, early bird, group, or ticket with an add-on.
A variation shares inventory with its price level and uses the event sale window unless you give it a custom sale window.
The table at the bottom shows ticket status and availability.
Add/Update Tickets Page for Assigned Seat Events
For a reserved / assigned seating event, create price levels, then add tickets to seats, rows, tables, or sections on the seating chart.
Warning!
Make sure that your seating chart is complete before adding tickets. Adding tickets to the seating chart will lock certain changes to the seating chart.
Price Level vs. Price Variation
These two terms are used throughout the event, season, package, and ticket setup pages.
- Price level: The main price assigned to seats or areas of the seating chart. If three areas have three prices, create three price levels.
- Price variation: An optional price under a price level that shares the same seats, such as senior, child, early bird, group pricing, or ticket with an add-on.
Add Price Levels
Click Add a Price Level. Create one price level per price, even if that price applies to multiple sections.
Examples of names are Front, Orchestra, Balcony, VIP, Adult, Student, or Early Bird.
By default, a price level uses the event sale window. Set a custom sale window only when that price needs a different schedule.
Use Advanced rules for minimum quantity, maximum quantity, or quantity steps when tickets must be bought in pairs, groups, or whole tables.
Use the matching code field on price levels and price variations when you need other features to target a ticket type, such as coupons, newsletter recipient filters, or per-ticket checkout questions. Matching-code filters accept one or more comma-separated fragments and match by case-insensitive contains, so VIP can match VIP, KidsVIP, or SeniorVIP.
Save the price level to close the popup.
List of Price Levels
The price level is added to the list. You can edit it, delete it, or add price variations.
Editing a price level affects all unsold tickets assigned to that level. To change only some seats, select those seats and use Update Tickets.
Add/Manage Price Variations
You can add as many price variations as needed. Variations appear with their price level and share the same seats.
A variation uses the event sale window unless you give it a custom sale window.
Editing Prices
Please note that editing a price level or variation, will affect all the tickets added at that price level. So if you want to raise the price of ALL $50 tickets to $60, even after the sales has started, you can simply edit the price level. However, to change the price level for some seats you should select those seats and use the "Update Tickets" button.
Adding Tickets
Now that price levels are created, we should add tickets for each seat. Tickets can be added and managed as granular as one ticket at a time, or in bulk as several rows or a full section at a time.
There are 2 methods to add, update or delete tickets.
Add, Update, Delete Tickets - Method 1
Using the top part of the page, you can select a 'Price Level', then select a range of seats and add tickets.
To add, update tickets using method 1, first select a price level.
Then select the section or table that you want to add tickets for. Then depending on the section type select the row range or seat range.
If the tickets are accessible (only allowed to be used by handicaps and their companions), tick the accessible box.
Accessible seats will show on the map as blue/white stripes.
If you want to block the seats, tick the block box
Blocked seats: Blocked seats cannot be purchased by regular users until you un-blocked them. However, administrators and sales agents with the permission to 'Sell blocked seats' can sell those seats. On the seating chart, blocked seats show as faded out to admin and sales agents, however they show as un-available to regular users.
Blocking can be used for several purposes. It can be used to temporarily make some seats un-available or reserve them for a potential buyer or you can block some seats and order physical tickets for them to sell offline in other outlets.
Then click on 'Add Tickets' to add those tickets to the seating chart. If all or some of the tickets already exist, you will get an error message and those tickets will not get re-added.
You can scroll down and verify the added tickets on the seating chart.
If the tickets already exist and you want to change their price level, you should use the 'Update Tickets' button.
Or use the 'Delete Tickets' to delete them.
To block or unblock tickets, or to change their accessible status, after selecting the seat range, use the "More Actions" menu.
Add, Update, Delete Tickets - method 2
Alternatively, you can add, update or delete tickets by clicking on a section, row, seat or table on the seating chart and selecting the proper option from the pop up.
If you are required to enforce safe distancing in your event, Ticketor provides all tools you may need.
This section assumes you are familiar with creating events on Ticketor. If not, click here to learn about Creating an event on Ticketor
General Admission Events
If your event is general admission, all you have to do is to reduce your Price Level's capacity to ensure that you are not selling tickets over what your venue can accommodate considering the safe distancing or you can set the Capacity Cap to enforce the capacity across all the price levels
Theater-style events
If your event is assigned seat with an amphitheater style seating, you may need to add some empty seats between each attending party.
To do so go to the 'Edit Event' page for the event, go to 'Tickets Tab' and set the 'Seats between each party' to the number of seats you need to leave between each party to adhere to safe distancing. When the buyer tries to purchase the tickets, the system will consider those extra seats and automatically enforce that while helping the buyer in selecting their seats.
If you need to leave vacant rows between parties, for example, you want to leave one row vacant after each row, simply do not add tickets for those rows. In other words, add tickets to row 1 and 3 but don't add tickets to row 2 and 4.
You can also set the “maximum party size”. To do so, edit each price level or variation and set the “Maximum number to purchase” to the maximum party size.
If you are concerned that you are going to have a lot of wasted seats because of the social distancing blocked seats, you can restrict the buyers on how they can pick their seats. For example, you may want to not allow buyers to pick seats in the middle of a row and limit them to the left and right side of the aisle. To do so, from the “Details” tab > “Options” section, “seating chart” box, choose the proper option.
You can always unblock the automatically blocked seats from the “Add/Update tickets” page.
Round-table / cabaret-style events
For round-table events, you may want to make sure that the whole table is being purchased by 1 party only and so the parties cannot share tables.
To do so, edit the price level / variation and set the “Minimum number to purchase” to the size of the table.
Timed-events (events with time-slots)
Recurring events, with time-slots, that can be used to limit the visitors to an event or activity are explained in details at the following blog and video:
How to create recurring events, classes or booking system with time-slots, using Ticketor
Seated Outdoor Events
Ticketor provides a state-of-the-art seating chart designer tool that allows you to create any type of seating chart including theater-style, round-table, cabaret-style or any combination in a matter of minutes and free of charge.
This feature allows you to make use of an outdoor area, like a backyard, park, beach, ranch or parking lot, and move your events outdoor.
Online Events
Ticketor supports online events, both live streaming or on-demand. You can use Ticketor along with your favorite streaming provider to sell tickets, do gate control and admission and stream your event online or monetize your videos.
How to create ticketed online event (live streaming or on-demand) or monetize your videos
Capacity Cap
In all type of events, you can specify a maximum capacity to ensure not more than certain number of tickets are sold across all the price levels and regardless of the seating arrangement.
To do so go to the 'Edit Event' page for the event, go to 'Tickets Tab' and set the 'Capacity Cap' to the maximum number of tickets you want to sell.
Outdoor Events
Considering the COVID-19 situation, it may be safer and less restricted to move the events outdoor, in a parks or an open area.
Taking the events outside of the theaters and auditoriums with standard pre-defined seating charts, requires a ticketing system that allows you to build any custom seating chart in a timely and economic manner
Ticketor's state-of-the-art Seating Chart Designer Tool, allows you to build any seating chart including the theater-style, round-table, night-club style or any combination of them, in minutes and for free.
Take advantage of this valuable feature and consider planning outdoor events to combat the COVID19 restrictions.
A venue is where your event happens, in person or online. It has a name, address or URL, region, and time zone. It may also include a seating chart for assigned seating.
Venues are reusable, so the same venue can be used by multiple events.
Create and manage venues from "Control Panel > Events & Venues > Venues". You can create a venue manually, search an address, or search venue templates across the platform and Google Maps.
If you copy a venue or seating chart from another organizer, preview it first and verify the venue details, time zone, and seating chart before selling tickets.
In the list, click on the icon to edit the venue, or on the to design the seating chart for assigned seating events.
Important notes:
The venue time zone is important. Event times and sale windows are calculated in the venue time zone.
You have two ways to reuse an event: duplicate it, or make it recurring.
1- Duplicate an event
Use duplication when you only need a few separate events, or when the events are similar but not part of the same repeating schedule.
Create the first event, review it carefully, then edit it and use the duplicate option on the "Details" tab. A new event is created that you can adjust independently.
You can also duplicate an old event, such as last year's event. Past events are available in the Event Manager; adjust the filters if you do not see them.
Sold tickets are not copied as sold. The duplicated event starts fresh, with all tickets available again.
The duplicate is private by default so buyers cannot see it until you finish editing. When it is ready, clear the private option and make it public.
Duplicated events are not connected. Changing one event does not change the others.
2- Create a recurring event
Use recurring events when the same event happens many times on a schedule, such as daily admissions, weekly classes, tours, or shows.
Start by creating the event as a normal single event. Test the event setup first, then change it to recurring and add the schedule.
In the scheduler, use "Event dates" to add the dates and times when the event happens. Click "Add event dates" and choose one date only, daily, weekly, monthly by date, or monthly by weekday.
Use "Skipped dates" for holidays, closed days, or any dates that should not be offered. Click "Skip dates" and add the dates or repeating pattern to skip.
If the event happens multiple times in one day, add one event date rule for each start time. For example, add one rule for 6:00 PM and another rule for 8:00 PM.
For example, you can add event dates for every Saturday and Sunday in the summer, then add skipped dates for the weekends when the event is closed.
On your public event list, buyers see the recurring event as one event. When they buy tickets, they choose the date and time from the calendar.
A recurring event is a template with a schedule. In "Control Panel > Events & Venues > Events", recurring templates are marked with the icon.
Each event instance is generated when it is needed, usually when a buyer starts buying tickets for that date and time. This keeps the admin event list cleaner, even if the schedule has many dates.
Generated instances are marked with a icon while they are still linked to the template. If you edit one instance separately, it is marked with a icon.
You can edit a single instance when one date needs different pricing, a different title or description, blocked seats, or other special changes. If the instance is not listed yet, add a ticket for that date to the cart to generate it, then edit it from Event Manager.
If you update the recurring template later, future generated instances use the updated template. Instances that already sold tickets, or instances you edited separately, keep their own changes unless you select "Overwrite all future instances of this recurring event" when saving the template. The overwrite option does not overwrite ticket sales, pricing changes, blocked seats, or sold seats.
Important: Always review the calendar after saving a recurring schedule. Make sure the event dates are correct, extra dates were not created, and closed dates or holidays are listed under skipped dates.
Recurring events, with time-slots, that can be used to admit the visitors to an event or activity are explained in details at the following blog and video:
How to create recurring events, classes or booking system with time-slots, using Ticketor
A season or membership is a pass that buyers can redeem for tickets to included events.
When a buyer purchases a season pass, they can later apply the pass in the cart to receive free or discounted tickets for eligible events.
You can add events to the season now or later as events become available. Included events can be single events or recurring events.
For recurring events, each pass usually applies to one ticket across all dates unless you configure the season to allow repeated redemption.
Passes can give a full or partial discount. For example, one event can be free with the pass while another is 50% off.
The season start date and duration define when buyers can redeem the pass. For annual seasons, set the duration to about one year.
Membership-style passes can expire a set time after purchase, such as one year after purchase. Use a long season duration and set the pass expiration period after purchase.
Pass expiration date gets printed on the ticket and can be adjusted from the sales invoice by the administrator.
Season passes / memberships can be set to auto-renew. The renew may be set to happen to the same season pass / membership, or it may renew to another season (next season). Renewing to the same membership is useful for cases like long-running classes with monthly membership or membership to a gym or museum. Renewing to the next event can be used for theatrical or sports season passes that the pass renews to the next season or next year pass.
If the buyer pays with a payment processor capable of storing the buyer's credit card for recurring purchases, currently only Stripe, the buyer's card will be stored in Stripe and the renewal tickets will be charged to the same card. However, if you are using other payment processors, or the card on file gets declined or is expired, reservation will happen and the amount is invoiced to the buyer. As soon as the buyer makes a payment for the invoice through the link provided in the invoice, the tickets are released to them.
The renewal happens at the end of the season for seasons with set end date or it will happen on the expiration date of the membership. It is important that at the time of renewal, the renewal event must be active, on-sales and tickets should be available.
To create a season, go to Control Panel > Events & Venues > Seasons, create a new season, complete the setup tabs, add included events, and save.
When buyers purchase a season, they receive a ticket with a code. They can redeem the code in the cart for eligible included events.
The apply-pass option appears in the cart only when at least one active season is within its redeemable date range.
Season passes are explained in details at the following blog and video:
Everything About Season Passes and Memberships for Theaters and Sports: Setting up, Selling, Redeeming - On Ticketor
A package lets buyers buy tickets for multiple events together. Package events can be single or recurring events.
To create a package, go to Control Panel > Events & Venues > Packages, create a new package, complete the setup tabs, add included events, and save.
Packages use the included event ticket prices by default. To offer a package discount, use the "Discount & Options" tab and create one or more coupons for the package.
For example, you can create a 10% discount for regular tickets and another 20% discount for VIP tickets.
When creating the coupon, set the "Event" to "Specific Package" and select the package by typing a few letters of it.
You may tick the "Automatically apply this coupon on checkout if the conditions meet" the box to make the coupon apply automatically.
If the coupon only applies when the buyer purchases all the events in the package or at least certain number of events in the package, make sure to tick the "Must buy all the events that this coupon applies to" box or fill the "Tickets must be for at least X different events" box.
Fill out the rest of fields, conditions and restrictions and save the coupon.
When buyers open a package, they can buy tickets to all included events together, or buy event by event when that option is available.
Important note: The buy-all-events-together option appears only when included events have matching price levels and price variations. For assigned seating, the events must also use the same venue and seating chart. Duplicate events when possible to keep package events consistent.
You may need to set up tickets for groups of certain size such as "Group discount", or a "Family tickets", "Couples tickets", "Double occupancy", or in case of a dinner-style event, "Whole table" tickets.
Let's assume your individual tickets are $50.00 and you want to setup a Family ticket for families of 5 at the price of $200.00:
First create a price LEVEL for individual tickets, set the face price to $50
Then add a price VARIATION to the individual price level using the below values:
Set the Name to "Family of 5"
Set proper description.
Set the face price to $40.00 ($200.00 / 5 = $40.00) . In other words set the face price to the price of individual ticket, when purchased as family group.
Similarly set the "Service charge" to the service charge of individual ticket, when purchased as family group.
Set the "Minimum number to purchase" to 5. It makes the ticket picker dropdown to start from 5 instead of 1.
Set the "Available in increments" to 5 also. It makes the ticket picker dropdown to have values of 5, 10, 15, 20, ...
Optionally set the "Maximum number to purchase" to limit the maximum tickets that can be purchases per transaction.
Using this setup, buyers can buy 5, 10, 15, ... tickets or in other words, they can purchase for 1 family, 2, 3 or more.
When they purchase tickets for a family, they will receive 5 individual tickets and 5 tickets get deducted from your inventory to make sure you do not oversell.
The same setup can be used to create group tickets, couple tickets or whole-table tickets.
Another method:
While the above mentioned method is best for most group ticketing cases, it may not be appropriate for all use-cases.
For example, if you want to use the method for an assigned seat event and for a big group like 10 or more, it requires that the whole group seat in the same row because they can only select 10 seats at a time, and it may not be possible due to limitation or availability on the seating chart.
In such cases, you can use "coupons" instead. Just create your individual price levels and variations and then create one or more coupons to give discount on purchases that have x or more tickets of certain price. The coupons can be set to require a coupon code or to be auto-applied and apply without any code as long as the purchase meets the requirements of the coupon.
If you are looking for Recurring Events and Event Replication, click here.
The term "Multi-day" event may be used to describe 2 types of different events:
The buyer needs only 1 ticket to attend all days:
Examples of such events are multi-day seminars, conferences or festivals.
To implement such event, create only 1 event, set the start date to when the event starts on the first date and set the duration to indicate the events end date on the last date. For example, the length of a 2-day event may be 1 day and 8 hours.
If you need to scan the tickets again on the second day, you have 2 options:
1- At the end of day 1, edit the event and from the details tab, click on "Reset scanned tickets". It will clear the scan results and so the tickets can be scanned again on the next day. Optionally, you can print or export the scan result before resetting from Control Panel > Reports > Sold Tickets
2- When attendees leave the venue on the first day, you can scan the tickets in "Exit mode" so the tickets will be scan-able again on the next day.
The buyer needs 1 ticket per day with optionally an option for multi-day pass:
You need to create 1 event per day so the buyer can choose what day they want to attend and the system can keep track of capacity and make sure that you do not over-sell for each day.
You can optionally create a multi-day pass with optional discount. To do so create a package and add all the individual days to the package and optionally create a coupon for the multi-day pass.
You can create questions to be asked from the buyer on the checkout page. Questions can be related to a specific event, merchandise, or donation and be asked only from the buyers who buy that event or merchandise (event/merchandise questions) or can be general and be asked from all buyers (site questions). Event questions can be asked either per ticket (per attendee) or per invoice.
An example of event questions for a dinner event could be: 'What option do you prefer for dinner? Meat/Chicken/Fish/Vegetables'. This question should be asked "per ticket" as each attendee may have a different dinner preference.
Another event question example that should be asked "per invoice" could be: 'Who referred you to this event?' Or 'How did you hear about this event? (TV/Radio/Facebook/Other)'
An example of site questions could be: 'How did you hear about our site?' or 'What type of events do you prefer to attend?'.
Merchandise questions can be asked once per invoice, or they can be asked once per item, meaning that if the buyer purchases 5 of that item, they have to answer the questions for each item, 5 times.
Some sample questions could be 'Special Requests', 'Customizations', etc.
For donations, some sample questions could be "Donor's Address" (as some countries are required to collect the donor's address), Dedication, Allocation of donation to certain cause, etc.
Questions and their answers get printed on the confirmation email and, optionally, on the tickets or donation receipt. They are also available and can be edited in the invoice and are reportable in the related report.
Asking unnecessary questions during purchase may cause the buyer to abandon the sale and may result in business loss. Only ask questions if they are really necessary and give value to the buyer.
Create questions
To create questions (for any event, merchandise, donation, or the site), use Control Panel -> Account & Settings -> Question manager. This page is like your question bank. You will create and manage all types of questions here and later associate them with events, merchandise, donations, or the site.
Enter the question, type of answer, and (optionally) a default value and specify if the answer is required. If the answer required is ticked, the buyer cannot complete the purchase unless they answer the question or tick the check box.
Hint: To create a multiple-choice question (dropdown) and not default to the first option, make sure the first option is a blank line (no answer). If the answer is required, then the buyer must select a non-blank answer.
Hint: To have the buyer agree to some term, create a question of type checkbox and make it required. The buyer will have to tick the box to complete the purchase.
Apply questions to event, merchandise, donation or site
After you create the questions, you can apply them to the whole site or specific events or items.
Site questions: To apply questions to the site, use the Control Panel -> Accounts & Settings -> Site Settings -> Options tab. In the questions section, type a few letters of the question, select it from the list and click on the Add question
Event questions: To apply questions to an event, Edit the event and go the Details tab. In the questions section, type a few letters of the question, select it from the list and click on the Add question
Per-ticket event questions by price level or variation: When adding questions that are asked for each ticket, you can optionally enter one or more price level / variation matching-code fragments separated by commas. If filled, that question is only asked for tickets whose price level or selected variation matching code contains one of those fragments, ignoring case. For example, VIP, Gold can match VIP, KidsVIP, SeniorVIP, Gold, or EarlyGold tickets.
Merchandise / donation questions: Edit the merchandise or donation. In the questions section, type a few letters of the question, select it from the list and click on the Add question
How to see the answers
The answer to the questions will be available in each individual invoice that can be accessed from Control Panel -> Events & Venues -> Sales & Invoices and will also be included in the confirmation email you receive.
You can also get a report of the answers in:
- Control Panel > Reports > Sales & Invoices (Site questions only)
- Control Panel > Reports > Admission list and Control Panel > Reports -> Detailed Admission list (Site, per event and per ticket questions)
- Control Panel > Reports > Sold Merchandise (Merchandise and donation questions)
Ticketor is a full-featured box-office solution. You can use it to sell tickets online, over the phone or at a retail location, ticket booth or box-office.
You can sell tickets, merchandise, donations and accept cash, check, credit or debit card or you can send invoices.
To sell in cash, check or to send invoices, the user (sales agent) needs the permission to do so. The permission can be granted from the User Manager page.
What do we need?
1- The user selling the tickets, needs to have "Sales Agent" role, potentially with the permission to sell in cash. Check out "Users with special permission" section for more information.
2- You also need a computer / laptop or tablet connected to internet.
3- For face-to-face sales, you probably need a printer and optionally a credit card reader. You can use a regular ink-jet or laser printer to print paper tickets, or a professional thermal printer to print professional hard-copy tickets. Check out "Set Up Your Box Office" section for more information about the equipment. Credit card reader is optional. You can manually enter the credit card information using your keyboard, however, a credit card reader speeds up the data entry.
How does it work?
Use the "Control Panel > Box-Office > Sales Page (POS)" or the direct link of https://www.Ticketor.com/POS to get to the fast, touch-friendly, POS (point of sales) page, where you can quickly select tickets, sell them for cash, check or credit card and print them out on a thermal or regular printer, or email the e-tickets or keep them at will-call.
Scan this QR code to open the POS page:

If the buyers email address is entered, they will receive the sales confirmation email. Depending on the delivery method you select, the confirmation email may or may not include e-tickets. 'Direct Delivery' is the default delivery method. 'Direct delivery' may or may not include the e-tickets in the confirmation email based on your configuration at Control Panel > Account & Settings > Delivery Methods.
To learn about running the application in kiosk mode, also known as single app or pinned mode, check out Running the Gate Control and POS app in kiosk mode
Reporting and active carts
Admins can review currently active ticket carts from Control Panel > Reports > Active Carts. This report shows event ticket carts that are still reserved but not checked out yet, with buyer information when available, session id, IP address, ticket details, expiration time, print and export options. Admins can purge a cart, or take over a cart to help a buyer complete their purchase over the phone, at the box office, by cash or check, or when the buyer is having trouble finishing checkout. If your current cart is not empty, you can choose to merge the selected cart into your cart or empty your cart before taking it over.
Invoicing
If the sales agent has the permission to send out invoices, they can sell tickets, merchandise or donations and send out an invoice to the buyer. The buyer, receives a confirmation email, WITHOUT tickets, with a link to pay the invoice. They can click on the link to make a payment or they can make a payment in-person at the point of sale. As soon as the invoice is paid, they will receive the link to access or print their tickets.
Returning or exchanging tickets by the buyer
You can set the return and exchange policy on your site, so the buyer can manage their own tickets and return, exchange or upgrade their tickets in accordance to the policy that you determine and paying the potential fee that you set.
Having a good exchange policy is actually highly recommended as exchanges do not allow returns. The buyer can exchange their tickets, only with the same number or more tickets at the same price or higher price. If they exchange their tickets with less expensive tickets, they will lose money and won't get any refund.
The exchange and return policy can be set for each event by editing the event. The buyer can log in to their account and from the menu at the top exchange or return their tickets, in accordance and if allowed by your policy, in a fully self-service manner.
Returning tickets by the administrator or the sales staff
You as the administrator or any sales staff with the right permission can return or exchange tickets and refund money anytime regardless of your returns policy. Returning tickets will void the issued tickets, make them available for sell again, refunds customers money and send them a "Return confirmation" email.
The money can either be refunded to buyer's credit card or credited to their account as "Store credit". If "Store Credit" is chosen, the specified amount will be credited to the user account and they can use this credit to make purchases on your site. It is a good option when the buyer wants to exchange their tickets.
- To do so, login to your website as admin or a sales agent with "Return Permission" and find the invoice that you want to make a return for. Invoices can be found from different areas of the site or Control Panel > Box Office > Find Invoice / Ticket Pickup
- Find the "Invoice" you are looking for by using the filters. You may need to change the from/to date range and hit the Refresh button to see the invoice. Select the proper Invoice by clicking on the icon to see the invoice details.
- To make full refund and return all the tickets in an invoice, from the "Invoice Actions" menu, select "Void Invoice"
- To return some tickets or make partial refund, check the checkbox in the "Return" column for all the tickets that you want to return.
- Then click on the 'Return selected items' below the table.
- A pop up shows up with the return information. You can move the pop up around by dragging the header section of the pop up and check the return checkbox for more tickets to add them to the return list.
- Select the refund method. You can choose either "Store credit", or "Return to their credit card".
- The pop up will indicate the return amount.
- If you are granted the permission to "Give Discount", you will be able to modify the return amount at this point. You can make a "Full Refund" which will refund the ticket face price + the service charge, or you can just return the face price by selecting "Ticket price (not including service charge) " or "Ticket price minus return service charge" which will consider the non-refundable fees and return fees as you specified in the event return policy settings, or you can refund a custom amount just by editing the "Return Price" box.
- Click on the "Return" button
- A confirmation email will be sent to the customer confirming the return of tickets.
Exchanging tickets, switching seats, upgrading, changing to a different date
The easiest method to offer exchanges, is to set the proper exchange policy for your events and so the buyer can login to their account and exchange / upgrade the tickets from the "User menu > Tickets > Exchange Tickets". This method does not offer any refund or money-back and is fully self-service.
However, you as the administrator, can also help buyers with exchanges and potentially make exceptions to your exchange policy.
To exchange tickets for a buyer, you have 3 options.
Option 1 (The buyer will choose and purchase the new tickets): Return the tickets for full refund (make sure to include the service charges) to the buyer's store credit account and ask the buyer to purchase the tickets using the store credit. They will receive the store credit on the checkout page.
Option 2 (You will choose and purchase the new tickets): Similar to when you want to return tickets, find and open the invoice and check the box next to all the tickets that you want to exchange. Then click on the 'Exchange selected items' at the bottom of the table. The tickets will get added to the exchange list of your shopping cart. Then proceed to adding the replacement tickets to your shopping cart. You can either use the POS page or the regular purchase page. On the checkout page, the balance from the exchanged tickets will show up. If you are upgrading tickets or buying more tickets you will have to pay the remaining balance, otherwise simply click on the reserve button. When you checkout, the old tickets will get refunded and replaced with new tickets. In this method, no refund is issued and if you downgrade the tickets, the buyer will not receive any refunds for downgrade. Behind the scene, a 'Return Invoice' and a 'Sales Invoice' in generated.
Option 3: Return the original tickets for $0 and purchase the new tickets for them at 100% at $0.
Managing and reporting store credits
You can report each buyer's history and balance from Control Panel > Reports > User History or from Control Panel > Account and Settings > User Manager, by clicking on the 'History & Balance' icon in the table next to the user's name.
You can adjust a buyer's store credit balance by recording a payment to or from them. Go to Control Panel > Account and Settings > User Manager and click on the 'Make / Receive Payment' icon in the table next to the user's name.
You can report all users' balances from Control Panel > Reports > User Balances.
Notes:
Ticketor gives you credit for the fees when you refund the tickets back to the buyer's credit card, however most payment processors do not refund your fee. Some may even charge for the refund transactions.
You can also consider refunding the tickets for Store Credit so the buyer can use the credit to purchase tickets to your other events so you avoid all payment processor fees.
If you refund a ticket, the Ticketor fee will only get refunded as credit to your account which can be used toward your further bills. Ticketor does not refund the fees back to your credit card or PayPal and does not issue refund checks.
Notes about exchanging tickets:
When you exchange tickets, the new tickets are purchased using store credit. Meaning that if later you decide to return the new tickets, they can only be refunded toward store credit and not back to credit card. If you need to refund to credit card, first return the tickets for store-credit. Then refund the money from your payment processor dashboard. Then record the payment in the user manager so the user balance becomes zero.
Exchange is designed with certain restrictions to make sure the event organizer does not lose money or it cannot be used as partial refund. For example, if the buyer exchanges a $100 ticket for a $10 tickets, they lose the remaining $90 and do not receive any credit or refund. Similarly, if the buyer exchanges a $100 ticket with 2 * $50 tickets, the $100 only covers the cost of one ticket and the buyer has
Refund protection or refund guarantee is being offered to the buyer on the checkout page for a fee, which enables the customer to get a full refund of the purchase price, from the covering company, XCover (not you), should they or anyone in their party be unable to attend due to:
- An injury, or an illness affecting you or a member of your immediate family.
- Public authorities issue a travel warning for the day of the event, or the day prior. These warnings include but are not limited to adverse weather and terrorism.
- The emergency services require your presence at home within 48 hours before the booked event.
Read the full terms and conditions here: https://www.xcover.com/en/pds/TermsandConditionsv4
Refund protection is offered through "XCover.com" (formerly Booking Protect), an independent, 3rd party company. All claims and refunds should be processed directly and solely through XCover. Ticketor or your company are not involved and shall not be hold responsible in the refund protection process.
What does XCover refunds?
XCover refunds the total price of purchased tickets, including all service fees and charges, if the buyer cannot attend the event due to certain unforeseen situations when the tickets are non-refundable and not qualified for refund from you.
XCover only covers tickets; and the refund protection fees are calculated based on tickets only. "Merchandise" or other stuff purchased from your online store (if any) are not covered.
Shall I Offer Refund Protection?
Refund protection is included for free for eligible Ticketor clients.
It is highly recommended to offer Refund Protect to buyers, especially if your tickets are non-refundable or your return policy is limited. Refund protect can increase your sales as it gives the buyer the peace of mind to go ahead and actually purchase the tickets even-though they may not be certain about being able to attend. Some buyers like the peace of mind that comes with buying protection for their tickets. Moreover, it is paid by the buyer and handled by a 3rd party so you don't lose anything.
Unexpected circumstances happen and buyers miss events. Regardless of what your return policy specifies, some buyers will call and ask for a refund. Offering refund protection reduces the chance of such situations and unhappy customers.
However, you can optionally disable this feature. If you want to disable the feature, you can simply disable it from "Control Panel > Account & Settings > Site Settings > Options".
How does it work?
On the checkout page, the buyer receives the option and information to purchase refund protection for certain fee. If the buyer chooses that option, the fee gets added to their total invoice amount.
The total amount including the refund protection fee, gets collected through your payment processor, by you.
The buyer receives a confirmation for the purchase of the refund protection.
You are responsible to pay the full collected refund protection fee to Ticketor, which in turn, will pay the refund protection provider.
The refund protection fee, will be billed to you by Ticketor and paid to the service provider. If you are using a payment processor that deducts the fees from each transaction, refund protection fees will also get deducted from each transaction, otherwise you will see a new row on your bills for the refund protection fee, which is already collected by you.
How do the buyers file a claim?
In case the buyer needs to get a refund, they should directly file a claim on the "XCover" website and provide the required documents. XCover is solely responsible and in charge of refunds and claims. Ticketor or your company are not involved in the process and shall not be held responsible.
All the information that the buyer needs to file a claim with XCover are included in their sales confirmation email and you and the buyer can access them again from their invoice. You can access the invoice from the sales report and the buyers can access it from their order history page. The buyer needs to create an account with the same email address they used to make their purchase on: https://www.xcover.com/en/login
Important notes:
The purchase protection fees are non-refundable. Keep that in mind when you are making a refund. Never refund the purchase protection fee.
Activation
You should activate refund protection for your buyers from Control Panel > Account & Settings > Site Settings > Options and you can change your preference at any time.
If you cannot see the option to enable refund protection on Control Panel > Account & Settings > Site Settings > Options, it means that your website is not eligible for refund protection. To request the feature, please contact us.
Ticketor is made to match the needs of all types of event organizers. From one-time small event planners to big concert or festival planners to all sizes of venues, we have the solution.
As a result, Ticketor is compatible with a wide range of equipment and a wide price range.
You can use Ticketor with absolutely no specific equipment or buy professional equipment that match your specific needs.
If you need help finding the right equipment, you can contact us.
Barcode scanning
This section discusses purchasing the right scanning equipment. To learn about scanning, check out Control Panel > Help & Support > Help & Instructions > Gate Control & E-Ticket Validation
Remember that you may have as many gate checkers, using different types of scanning equipment to perform the scanning.
1- Camera:
The easiest way to scan tickets is to use a device, connected to internet, with a camera. A smartphone, maybe your personal phone, is a perfect option. Simply launch the gate control app and point your camera to the QR code to scan it and see the result on your display. Use a modern phone with a decent camera and auto-focus functionality for best result.
Any device with a modern browser like Chrome, Firefox or Safari that is connected to internet, Wi-Fi or cellular data (4G, 5G), is suitable for this purpose.
2- Barcode Scanner (Bluetooth / USB):
The only issue with using the device camera for scanning, is that the camera may take a few seconds to focus and scan the QR code and the camera should be hold close to the ticket to focus and scan. For high-traffic events, you can simply connect a small, low-cost, handheld barcode scanner that connects to your device (smartphone) via Bluetooth (or maybe USB) and can read the QR code very quickly and from a longer distance and submit the data to the device (phone) for validation. The result will show up on your device screen.
For this purpose, you can use lower-end devices or phones without a decent camera
The barcode scanner should be able to connect to your device and submit the barcode and / or QR-code as simple text followed by an ENTER (newline). A 2D barcode scanner can read both barcodes and QR-codes while a 1D scanner can only read the barcode. The best option is to use a smartphone with a Bluetooth 2D barcode scanner that can read from a phone display as well as paper tickets.
After connecting / pairing the scanner with your device, simply launch the gate control app, set the focus in the barcode box and point the barcode scanner to the barcode or QR code and scan. The result will show up on your device.
Considerations in choosing a phone:
- Connectivity: Are you going to use network data (4G / 5G) or Wi-Fi? If network data is being used, make sure the phone is compatible with the data provider you have in mind and the data provider has proper reception in your area. If Wi-Fi is not available in the gate area, you may consider getting a hotspot. A hotspot uses mobile data from a network provider and creates a Wi-Fi in the area and several devices can connect to a single hotspot.
- Display size
- Battery life
- If you are planning to use camera instead of a Bluetooth barcode scanner, you need a high-quality camera with auto-focus.
- In general, we recommend Android devices over IOS as the Android operating system is more open and flexible.
Compatible Barcode Scanners:
Any Barcode scanner that can connect to your device (through USB or Bluetooth) and can work in HID mode and can scan CODE-128 barcodes and optionally QR codes can be used with Ticketor.
HID (human input device) mode, means that the Barcode scanner can work as a keyboard and enter the barcode in any text field. In other words, it should send the barcode information to the device as clear text.
The best practice is to use a Smartphone as the device. In that case, make sure the Bluetooth barcode scanner is compatible with your device. They should specifically mention that they are compatible with IOS or Android.
2D (2 dimensional) scanners that are capable of scanning QR codes, give you the flexibility to scan either the Barcode or the QR code and may scan faster.
Most barcode scanners can scan from a phone display. Getting a barcode scanner that can read from the phone screen will give you the flexibility to scan tickets from the attendees’ phone and not require them to print the tickets.
You can buy a compatible Bluetooth barcode & QR-code scanner, that works with Android / IOS / Windows and can read from paper and phone display, and is suitable for one-handed scanning from Ticketor's Store.
For more professional use cases, you may want to consider SocketMobile Attachable Barcode Scanners (S840) that comes with variety of accessories including Klip cases, Dura Cases, chargers, etc.
Point of Sale Device
To sell tickets or merchandise in-person, you can use any computer / laptop, tablet or phone, preferably touch-screen and big enough to easily fit the POS page and your seating chart.
Point of sale device should be connected to the internet (wired or wireless) and should also connect to other POS equipment such as the ticket printer and the credit card reader.
Some devices may only work with Windows devices while some other may only work with Android / IOS. If you choose network ticket printers and credit card readers, you can use them with any operating system as the devices communicate over the network and there is no need for special ports / drivers or applications to be installed on the device.
Ticket Printing
Depending on your budget and use-case you can choose what type of ticket printers you need. You may get away with no printer at all, or a regular office inkjet or laser printer, or a professional thermal ticket printer or depending on the use-case, a portable or wearable receipt or label printer.
No Printer (Email or Text Tickets):
For small events, you may get away with no ticket printing. When you sell tickets, you can choose the tickets to get emailed to the buyer and the buyer can either show them on their phone or print them at home.
Home or Office Printers:
You can also use a home / office regular printer and print tickets on regular paper and hand them out.
Thermal Ticket Printers:
For professional use-cases, you want to use a thermal ticket printer. These printers can print tickets quickly, on thermal stock ticket papers. Besides barcode and QR code, the stock papers may also be secured by other security features like black-light holograms.
You can use a wide range of thermal printers and papers with Ticketor.
Boca, Zebra, Citizen Thermal Ticket Printers:
We natively support Boca printers (or other printers compatible with FGL) and printers supporting ZPL language, including Citizen, Zebra, and many other brands.
Check out Ticketor Store for compatible Boca and Citizen ticket printers and secure stock thermal papers in beautiful design and 6 colors.
Both Boca and Citizen printers are good for POS and transactional ticket printing. However, the Boca printer comes with a hopper to collect the printed tickets and can hold about 200 printed tickets which makes it more suitable for printing tickets in bulk.
We recommend purchasing a printer with Ethernet network connection so it will get connected to your router and can be shared by multiple POS devices regardless of their operating system.
For bulk ticket printing you need a Windows-based computer.
Other Thermal Printers:
Other thermal ticket printers or receipt printers are supported through the printer driver.
You can use them with standard stock ticket papers or with thermal role (receipt or label) continuous paper.
Credit Card Readers
When you are ready to check out, you will be asked to enter the payment method.
You can select cash or check option and receive the cash or check. You can also accept and charge a credit or debit card.
Using the keyboard:
If you don't have a credit card reader, you can fill out, or ask the buyer to fill out the credit card information in the proper fields through keyboard and the payment will get processed using your payment processor.
For faster and more professional operation you can add a credit card reader. The credit card reader that you use must be compatible with your payment processor and Ticketor.
Stripe Card Reader
Stripe offers a professional, countertop credit card reader that supports touch (NFC), chip and swipe. It processes the card as 'Card Present' which qualifies you for lower transaction fee and lower chargeback responsibility. The card reader gets connected to your network (LAN) through Ethernet or Wi-Fi and so is more suitable for your permanent box-office, where you have a LAN network. You can use Stripe Verifone or BBPOS WisePOS E credit card readers with Ticketor. Since these card readers connect to your network, they are compatible with all devices and operating systems.

Purchase the card reader here
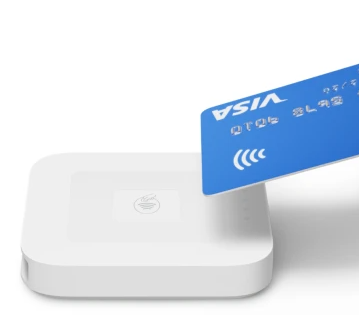
Square Card Readers
Square offers a range of portable Bluetooth card readers for Android and IOS. They are perfect solution for selling on-the-go, on mobile, or in temporary ticket booths. They process the card as 'Card Present' which qualifies you for lower processing fee and since they connect to your device directly through a physical connection or Bluetooth, there is no need for LAN or Wi-Fi and you can use them with your devices data. You can use any Android or IOS Square card reader with Ticketor.
Purchase the card reader here
Generic Card Readers
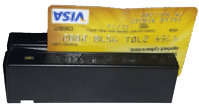
Generic card readers read the magnetic stripe on the credit card and fill the information in the proper fields on the website. You will need to manually enter the CVC and zip code and the card gets processed as an online (card not present) transaction. For this purpose, you can use a compatible MagTek card reader. It is a USB card reader, compatible with Windows or Mac and does not require network or Wi-Fi. It is compatible with payment processors like Stripe, Authorize.net or Braintree but not PayPal and Square.
Purchase the card reader here
Other Card Readers
To use any other non-compatible credit card readers, like the ones you may already own for in-person transactions, you can charge the buyer using the external terminal and mark the transaction in Ticketor as cash. Ticketor issues the tickets and you will receive the money using your external card reader / terminal.
This section explains how you can setup your box-office or retail location.
To learn about compatible equipment and to purchase one, check out Find / Buy Box-Office and Scanning Equipment
Please note that all the box office settings get stored locally in your browser. It allows you to have different POS stations and each station may use a different device (printer or card reader).
1- Credit Card Reader:
- Purchase a compatible card reader as specified in 'Find / Buy Box-Office and Scanning Equipment' section.
- Use Control Panel > Box-Office > Credit-card reader to select the credit card reader. Follow the instruction on the page.
- On the checkout page, or the point-of-sale page, click on the credit card reader icon to activate and charge credit cards.
2- Thermal Printer:
Important Update (September 2025): Chrome, Edge and some other browsers have made changes that blocks the website to print to the thermal printer. Go to chrome://flags/#local-network-access-check and Disable the flag " Local Network Access Checks" to make the printer work again.
Please follow the instructions in this PDF file .
3- Client Facing Display: (CFD)
Client Facing Display is an optional secondary display connected to your device at the point of sales that is facing the client, and shows them information about the items they are purchasing, the seating chart, their shopping cart, their total and allows them to participate in filling out information, such as their name, email or to select seats on the seating chart and also to select the tip amount.
This display should be touchscreen, to allow the buyer to input their information. It can be a double-sided display specifically designed for the point of sales or it can be any monitor in any size or form that is connected to the same device / computer and extends the primary display.
The client facing display should be connected to your device (computer) at the POS and it should be configured to extend the display. (Not duplicate the POS display)
When you open the POS page, the CFD page opens up in a new window and adjust itself to full-screen on the other display, facing the client. You can also hit the small 'Full Screen' button at the bottom-left corner of the FCD window to make it full-screen.
From now on, the client can see their shopping cart and certain dialogs such as the buyer information, tip amount selector, seating chart, etc.
The CFD page and the pop-ups can be configured to open automatically, or the sales person can open / close them or set them to read-only mode using the following icons that are available on the POS page and certain dialogs:
Since you are selling tickets online, you probably don't need traditional physical printed tickets. Most people will buy online and either print their tickets at home or just show them on their phone. You can even use the same approach for your retail locations and over-the-phone sales. Check out Control Panel > Help & Support > Help & Instructions > Sell tickets over the phone or face-to-face at a retail location or the box-office for more information.
However, if you need physical tickets, using Ticketor, you can print physical (hard) tickets with barcodes that are compatible with the e-tickets and can be scanned using the same scanning process.
You can either purchase a thermal ticket printer and ticket stocks from Ticketor's store and print hard tickets by yourself or order tickets so we print and ship to you.
Printed tickets will look like:
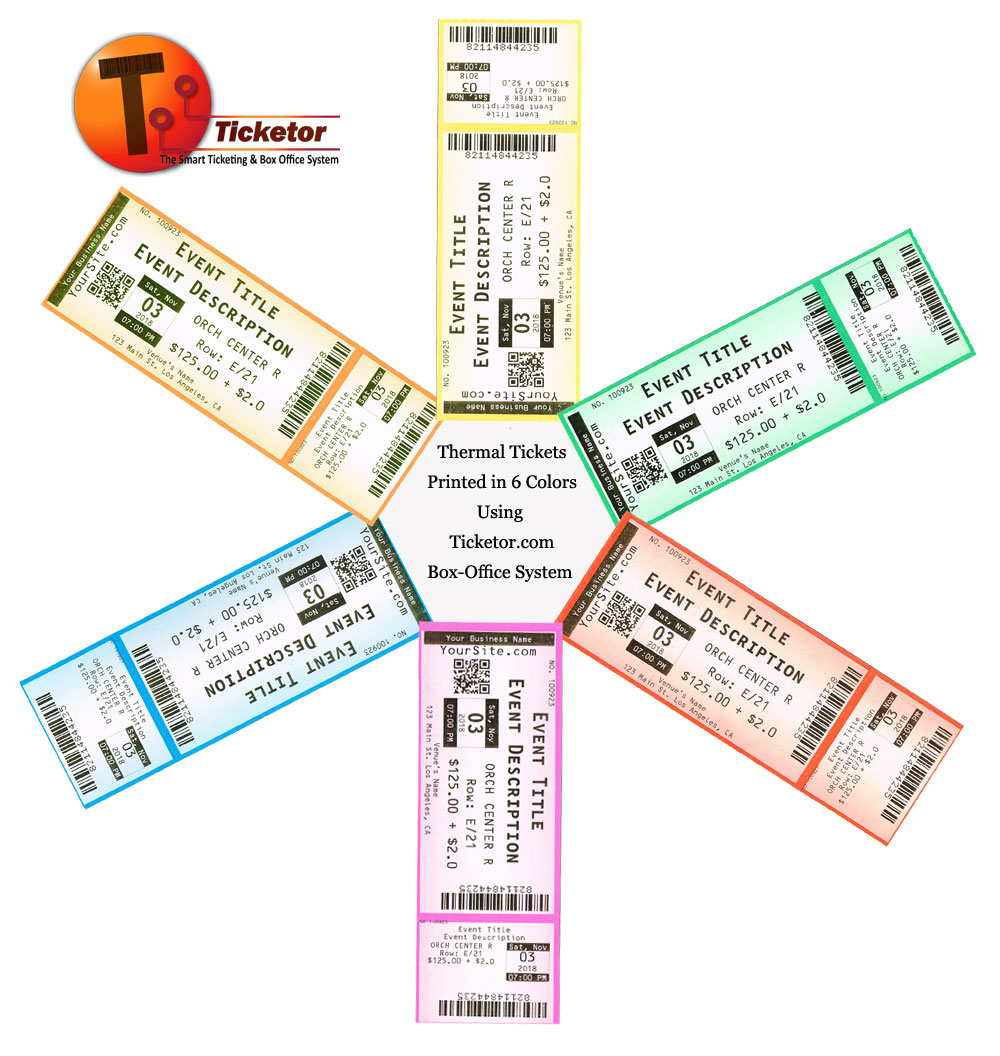
You can print in up to 6 colors.
To order tickets:
-
For general admission events:
- Go to the Add/Update Tickets page
- Create 1 or more price levels, specifically for print. For each price level, set the "End sale" date to the past so that those tickets do not sell online.
- Add as many tickets you need to be printed to each price level. The tickets should show as expired since you have set the sales end date to the past and so they will not show up on your ticket sales page.
- Click on the 'Order Hard Tickets' button.
-
For assigned-seat events:
- Go to the Add/Update Tickets page
- Click on the 'Order Hard Tickets' button.
When the invoice is paid, we print one ticket and email you for approval. Upon your approval, the tickets will be printed and ship to your shipping address.
We usually print tickets in 2 to 3 business days but you can confirm with us for accurate delivery time.
Cost:
The cost of ticket printing is as follows:
- $20.00 setup fee per order per event
- $0.10 per ticket
- $10.00 per price level
- $10.00 shipping. 2 to 3 business days shipping in US.
- $25.00 (optional) expedite print and ship. Next day shipping. Confirm for availability.
Corona virus or other temporary event interruptions - What to do and best practices
As many businesses are getting affected by this virus, event organizers are among the ones who are hit the hardest, with many events postpones or cancelled.
On the other side, are millions of ticket buyers who are isolated at home and are craving some sort of entertainment and activity.
What can you do to minimize the damage?
1- Move your event online:
Thanks to the technology, a lot of events can be performed online. Events such as conferences, speeches, most classes, stand-up comedies or even music, concerts, shows and performing events.
Events can be streamed through social media or YouTube or in video conferencing services such as Zoom or Webex.
Can your event be performed online? Be creative and find solutions to keep your business going.
You can keep selling tickets through your Ticketor website. Create a venue and call it "Online".
You can communicate the link to attend the event in different ways:
1- Edit the event and put the instruction and link in "After Purchase Notes" so the buyer will receive the information on their confirmation page.
2- Or keep the information confidential and send an email to them a few hours before the event using the Newsletter feature with the link and instruction to attend.
Some of the streaming services, allow you to limit the attendance to certain people. In that case you can download the Admission List and upload it to the streaming service so only people who purchased the tickets can attend.
2- Postpone the event instead of cancelling
Cancelling the event will cost you the payment processor fees as well as loss of current sold tickets as most payment processors do not refund the collected fees.
Moreover, you have to have enough cash available in your account to refund the tickets.
If postponing the event is an option for you, the buyers can keep their tickets and seats until new date is announced.
Most organizers are trying this approach and most buyers are understanding and cooperative.
Some suggestions if you need to postpone the event:
- Edit the event and from the details tab, add a red ribbon with the word "Postponed". Potentially add "Postponed" to the event title as well.
- In the event description, explain that the event is postponed and why and that the new date will be announced later and that the tickets will be valid for the new date and the buyers will keep their seats.
- If you want to stop the sales, set the "Sales end date" for the event to the past.
- If you have a new date change the event date, otherwise potentially change the date to an approximate date or keep the current date.
- Use the newsletter to send emails to people who purchased tickets to the postponed events and let them know about the date change.
- If necessary, you can process refunds or exchanges on a case by case basis. Optionally you can send out an email and asking anybody who needs a refund to respond to that email.
- Potentially you can edit the events Return Policy or Exchange Policy and allow the buyers to return or exchange their tickets in a self-service manner.
When the new date is confirmed, edit the event, change the date, change the sales end date, update the event description, remove the red ribbon or update it to "New date".
All tickets will remain valid for the new date. The buyers do not have to re-print their tickets, however, if they do, they will get the tickets with the new date on them.
Note that:
1- You can adjust the refund amount to any amount that you want to refund. The refund amount can be any amount between zero and the invoice amount. So you have full control on how much you want to refund.
Some common options are refunding full amount, refunding full amount minus the service charge.
2- Refunds can be made toward Store Credit or Refund to buyers credit card.
The buyer can use the store credit to purchase tickets later on your site.
If a purchase is made using the store credit, no payment processing fee and no Ticketor fee applies to the amount paid by the store credit. So if returning for Store Credit is an option, you can save some fees by doing so.
What should I do if my event is cancelled?
Events may get canceled or postponed for different reasons. What you do in case the event is postponed or canceled is up to you and your business strategies. Ticketor does not force you into taking any action however we provide the tools for you to properly inform the buyers of the cancellation and to refund the tickets.
Postponing an Event:
If you are considering postponing an event to another date, you can simply edit the event and change the date. All sold tickets will remain valid and scan-able. If the buyer access the ticket after you change the date or re-prints their ticket, the tickets will have the new date.
You can inform the buyers of the new date or follow the Refund instruction to refund those who may not be happy with the date change.
To send an email, simply use the Control Panel -> Events & Venues -> Mailing list and send an email to all the people who purchases tickets to that specific event, explain the cancellation and when and how they are going to get refunds.
Cancelling an Event:
Most organizers inform the buyers of the event cancellation as soon as it happens and let them know that they are going to be refunded in few days. This will reduce the chance of any possible credit card dispute or charge-back.
- Edit the event and set the "sales end date" to the past so the sales will stop. You may want to also update the title and add "Cancelled" to the title. Also, you can explain the cancellation reason and when the buyers can expect a refund in the event description or title.
- To void or refund the invoices follow the instruction in Control Panel > Help & Support > Help & Instructions > Returning or Exchanging Tickets / Voiding Invoices. Credit card refunds will show up on the buyer statement in a few days. So, you may want to ask the buyers to be patient and wait a couple days to see the refund.
Ticketor refunds your fee when you refund the tickets back to buyers credit card, however most payment processors do not refund your fee. Some may even charge for the refund transactions.
To avoid such fees, you should do your best to avoid cancellation and if possible postpone the event instead of cancelling.
You can also consider refunding the tickets for Store Credit so the buyer can use the credit to purchase tickets to your other events so you avoid all payment processor fees.
If you refund a ticket, the Ticketor fee will only get refunded as credit to your account which can be used toward your further bills. Ticketor does not refund the fees back to your credit card or PayPal and does not issue refund checks.
Ticketor is not only a great solution for all your ticketing and box-office needs, but also it is great for your giftshop, restaurant, bar, concessions, souvenir store or selling any merchandise, service, food and beverage. It allows for online sale as well as POS (point of sale), so your staff can sell face to face.
It can create a fully integrated system with seamless user experience and unified reporting and accounting.
The main goal of selling food and drink through your Ticketor site is to increase the sales by eliminating the line and wait time and reducing friction.
 |
❝How much more you could sell by eliminating the line at your concession, bar, or food trucks?
|
Here are some of the highlights of the Ticketor's store:
- Create different pages for giftshop, restaurant, bar, gift cards, etc.
- Buyers can order food or drink and have it delivered to them in certain location inside the venue, such as their seat in the theater, their table in the restaurant or to the lounge, conference room, jacuzzi, pool, their booth, their room, tennis court, etc.
- Buyers can pre-order food / drink along with their tickets and set the order date for a later date/time so, they can pick them up as they arrive at the venue or at certain time.
- Buyers can order merchandise or food online and have it delivered or shipped to their home or pick up from your store at the time of the event or any other time
- A preparation page for your bar or kitchen staff so they can receive and track the orders as soon as they are placed
- Buyers can order and pay for their drink or food from the comfort of their seat within the event and receive it at their seat. Or they can order food or drink while they are on the way to the venue and pick it up as they arrive
- Merchandise, food and drink can be purchased along with tickets all in a single transaction
- Merchandise can be added to the pre-checkout page so as the buyers are buying tickets, the system will suggest that they should also consider buying the related or recommended merchandise.
- QR codes can be posted as signs in different locations of the venue or on the restaurant tables that take the buyer directly to the store page
See a store page on our demo site by clicking on each link:
|
❝How much more you could sell by allowing people to order food or drink without leaving their seat and the event?
|
 |
Setting Up Store Pages and Merchandise
1- Add Store Pages
To start selling merchandise or food, you need to add one or more pages of type 'Store'. Go to Control Panel > Account & Settings > Pages & Navigations and add one or more pages of type 'Store'
Pages may or may not be added in the top nav or they can be added as a sub-menu.
Then click on the link to the Store page to navigate to the page.
The gear icon at the top of the page allows you to customize the page and select the categories of items that are shown on the page. When a page is created, a private category is automatically created for the page and so any item that is part of that category will show up on the page. However, you can edit the page and change the categories that the page will use.
You can also set the design and style of the page and how the items are shown. Items can be shown as cards in a gallery or a list with or without pictures. If you choose the gallery view, the card items may all have the same size or they may have different sizes. If you intend all the cards to have the same size, make sure to select that option and also make sure the primary image uploaded for items on the page all have the same aspect ratio or same size.
Note that making all cards the same size may result in longer text and titles to be trimmed but allowing the cards to have different flexible sizes will show the full text and titles.
You can use the 'pencil' icon to add content to the page or use the 'image' icon to add a slideshow or banner to the page.
2- Add Categories
Next step, is to add some categories. Categories can be public or private.
Private categories are only visible to you and your staff to categorize items for your operation purpose. While the public categories are visible to the buyer for filtering and categorizing items.
One item can be in multiple categories. Categories themselves can be part of other categories to create sub-categories.
Categories have multiple purposes:
- Each store page is set to show one or more categories. This is how you control what items to show up on what pages.
- Categories may show up on the store page as filters so the buyer can easily filter items by category. This option can be set on the store page settings. If a store page is set to list multiple categories, all the public categories will show on the store as filters.
- Sub-pages: If a page is set to show a certain category, all the sub-categories in that category will show up as sub-pages. For example, in the demo restaurant page, 'Entrées' and 'Desserts' are sub-categories that are displayed as sub-pages.
- POS page: POS pages can be set to show items from certain categories so for example the bartenders can only place bar orders and giftshop staff can only order giftshop items
- Preparation, shipping and handling and operation: Items may be placed in categories for the purposes of operation and preparation. For example, you may want all the food orders that require a stove oven to show up on the preparation page of the 'stove section of the kitchen' while all other food orders go to another section of the kitchen and all the beverage orders to go to the bar. For this purpose, you can put items in private categories that are only visible to you and your staff, such as 'oven foods' and you can have a computer or tablet in each section of the kitchen that shows the orders in certain categories as they are placed.
- Reporting: Reports can also be filtered by categories
Categories can be created or edited from the Control Panel > Events & Venues > Merchandise / Donation page. Give the category a name and you can optionally make it sub-category to other categories. Optionally add some description and pictures for the category.
When you create a store page, a private category is automatically created for that page to make it easy for you to add items to that page. However, you may choose to ignore or delete that category.
3- Add Delivery Methods
Before adding merchandise to your store, it is best to add some delivery methods so when we create merchandise, we can select what delivery methods are available for that item. However, you can always come back to add new delivery methods or update the existing ones.
Use Control Panel > Account and Settings > Delivery methods to create and manage your delivery methods and associated fees.
On this page, you can create, edit and manage delivery methods that can be used by events or merchandise. The system allows delivery methods to be shared between events and merchandise, however, in practice, it is usually best to have different sets of delivery methods for tickets and merchandise.
Add a 'pick-up' Delivery Methods
So, let's add a delivery method for 'Pick up at the bar' or restaurant or giftshop so the buyers have the option to pick up their items.
Give the delivery method a name and optionally a description. Set the delivery fee to zero as we are not going to charge for pick-up method. Since this method is not used in events, you can skip the 'For tickets' tab and go to 'For merchandise' tab.
I enter a large number, 1000, in the 'Delivery fee is for' box and check the box that 'Multiple shopping cart items can share the cost of delivery'. Then save the delivery method.
Combining Delivery Methods Between Different Items:
Normally, the buyer needs to select the delivery method for each item in their shopping cart. For example, if a buyer is ordering a shirt and a CD, they can select the shirt to be shipped and the CD to be picked up.
While this functionality may be desirable in the case of shirt and CD, it may not be expected in some other cases. For example, if a buyer is ordering a Pizza and a Burger and a Pepsi, they do not want to select the delivery method 3 times for each item. The same delivery method should apply to all 3 items. In other words, all 3 items should bundle together so the buyer can pick the delivery method only once.
To achieve this, you should:
- Tick the box that 'Multiple shopping cart items can share the cost of delivery'
- All the items (Pizza, burger and Pepsi) must have the exact same set of delivery methods. Meaning that if one item supports 'Delivery method A' and 'Delivery method B', all items must support the same delivery methods.
- All the delivery methods supported for all the bundled items must have the box 'Multiple shopping cart items can share the cost of delivery' ticked.
If all the above conditions are met, then the items in the shopping cart get bundled together and the buyer will select only one delivery method that applied to the bundle.
Delivery Method Fees and Fee Sharing
Delivery methods may have a fee associated with them. For example, the fee to ship a toy car may be $10 and it ships in an individual box. Obviously, the cost of shipping 2 toy cars would be $20. This usually applies to items that ship individually using a mail (post) system.
However, there are cases that the delivery cost is the same no matter how many items you order. For example, the cost of local pizza or food delivery is the same flat fee no matter if you order 1 pizza or 5 , or if you also order some drinks.
Or in some cases you may want to combine the delivery fees to encourage the buyer to purchase more. For example, the delivery cost of 1 CD may be $5. However, you can fit up to 10 CDs in the same package and ship all of them at the same cost.
To achieve this goal set the 'Delivery fee is for X items'. If you set it to 1, it will be suitable for the toy car scenario. If you order 5 toy cars, you pay 5 times the delivery fee.
However, if you set it to a large number, like 1000, it means the fee is the same, no matter how many items you order, which makes it suitable for a scenario like local food delivery.
For the CDs example, you can set it to 10. So, if the buyer orders 1 to 10 CDs, they pay 1 time the delivery fee. If they order 11 to 20 CDs, they will pay twice the delivery fee.
However, fee sharing is usually useful when used along with the 'Combining delivery methods between different items', explained in the previous section.
It is unlikely that a buyer would buy 5 of the same CD. They would probably want to buy different titles. So if all different CDs are created with the same set of shareable delivery methods, a buyer can buy 5 different titles and combine delivery methods to pay 1 time the delivery fee.
Similarly, all bar or restaurant options should be created to share delivery methods and so the delivery fee applies to all items.
Add a 'Deliver Within Venue' Delivery Method
I am going to add a second delivery method. Choose 'deliver within the venue', name it 'Deliver to my seat in the theater', add some description, set the fee to zero and switch to the 'For merchandise' tab. To make this delivery method sharable with all food and beverage inside the buyer's shopping cart, I am ticking the box for 'Multiple shopping cart items can share the cost of delivery'
Then I switch to the questions tab. This delivery method should ask where exactly is the user seating. Which in the context of a theater the seats are usually identified with 3 values for 'Section', 'Row' and 'Seat number'.
So, I am opening the question manager page to create 3 questions.
'What section are you sitting at?', 'What row are you sitting at?', and 'What is your seat number?'
I create the first 2 questions of type Dropdown with certain items that the buyer can choose from. I will set the default value to blank and I add a blank option as the first option so by default, no section is selected. Then I add the list of sections as the next options. I marked the question as 'Answer required' so the buyer cannot leave the question blank.
For the seat number I create the question as a textbox with a maximum answer length of 3 so the buyer can enter a 1 to 3 digit seat number.
Then I switch back to the tab where I was creating the delivery methods and by typing a few letters of the question, I add the question to the delivery method and I save the delivery method.
Add a 'Local Delivery' Delivery Method
We are adding a local food delivery. So, I am choosing 'Mail / Post / Delivery' as the delivery type. This method automatically collects the shipping or delivery address.
Name it 'Deliver to my location', set some description like 'Deliver within 10 Miles of the venue' and let's set the delivery fee to $10. This fee is fixed regardless of how many items such as how many pizza or food or drink they order.
So, in the 'For Merchandise' tab, I set the 'Delivery fee is for' to a large number and I tick the box that 'Multiple shopping cart items can share the cost of delivery'. Then save the delivery method.
Add a Shipping Delivery Method for Larger Items
We are now adding a ship by mail / post service delivery method for larger / heavier items that ship individually in individual packages.
So, I am going to choose the 'Mail / Post / Delivery' method, name it '2 day air shipping', add some description and set the fee to the fee for that specific merchandise weight or box size. You may need to create multiple delivery methods with different fees for bigger and smaller or heavier and lighter items. When you create the merchandise, you can select what delivery method applies to that specific merchandise.
I am setting the fee to $10 for this one.
In the 'For merchandise' tab, I set that the fee is only for 1 item. So, if the buyer orders 2 items, they should pay double the delivery fee. I am also un-ticking the 'Multiple shopping cart items can share the cost of delivery' so each item will ask for the delivery method.
Add a Shipping Delivery Method for Small Items
We are now adding a ship by mail / post service delivery method for small / light items such as CDs that we can fit multiple into a single package.
So, I am going to choose the 'Mail / Post / Delivery' method, name it '2-day air shipping', add some description and set the fee to the fee for that specific merchandise weight or box size.
I am setting the fee to $10 for this one however, I can fit up to 5 CD's in the same package and ship them all at the same $10 shipping fee. So I am taking this opportunity to encourage the buyers to order more items. I add in the description that the fee is good for up to 5 CD or DVDs.
In the 'For merchandise' tab, I set that the fee is for 5 item. So, if the buyer orders up to 5 items, they get charged $10. But if they order 6 to 10 CDs, they will pay $20. I am also ticking the 'Multiple shopping cart items can share the cost of delivery' the buyer can combine different CDs and DVDs or any merchandise that use this delivery method.
Add More Delivery Methods
You can add as many delivery methods as needed, with different charges.
4- Add Merchandise
Next, we are going to add merchandise for sale. It includes all giftshop items, food, drink and gift cards.
Merchandise can get added, edited or managed from the Control Panel > Events & Venues > Merchandise / Donation page. However, there are other places and shortcuts that allow you to add or manage merchandise, such as the 'Actions' menu on the Store page or the merchandise page.
Click on Add a new merchandise.
Then set the name.
The code is optional and can be the barcode of the merchandise or a code that your sales staff can easily remember to find and sell the merchandise.
Keywords are hidden to the user and are only used for search engine optimization.
You can mark the product as Active. Inactive products do not show in the store and are not sellable.
Featured products show at the top of the list of items in the store page.
If a product is marked as 'Sold out', it will not be available for sale.
Private items are only visible and sellable by you and your staff and buyers cannot buy or order them online.
Set the item price.
If the item is on sale, you can set a sale price. It will show the original price as well as the sales price to the buyer.
Set the currency for the item.
Optionally set the sort order. Items with higher sort order show first in the store page.
Set the event organizer for the merchandise. In most cases, the event organizer is you, the admin. However, if this product is sold by a 3rd party, by adding that 3rd party as the event organizer, it allows them to receive emails when their merchandise sell and they can report that merchandise.
Also, if the event organizer is using a different payment processor and bank account, the sales money for the item will go to the event organizer's payment processor.
If the item is taxable, set the tax percentage to be collected. The tax amount will get added to the buyer's invoice and you will receive the tax amount along with the item price and your accountant can later file the tax and pay any due amount.
Items can be eligible for Tip or not. If an item is eligible for tip, the system will ask the user to consider tipping and will offer different tip amounts or percentages in accordance to your settings in your site settings.
In the categories tab, select all categories that this item belongs to. Check out the categories section above to learn what categories are used for and why they are important. The item should be in a category for it to be shown on the store page.
In the delivery tab, select all delivery methods that apply to this item.
In the Availability tab, you can select when this item is available to be ordered. While giftshop items are usually always available, food and drink may be limited to certain schedule. For example, if you are a venue, your bar or concession may only work during events hours and start working 30 minutes before the event and up to 30 minutes after the event. If you are a restaurant, food is only available during the kitchen hours and some items may be restricted to certain hours like 'Lunch Hours'. You can set the schedule and limit the ordering time to those hours. Also, you can specify if the item may be pre-ordered for certain date and time. For example, as the buyer is purchasing movie tickets for next week, they can also order popcorns and drinks to be ready 10 minutes before the movie so, they can pick them up as they arrive to the theater without any line or wait time.
Your Schedules can either be tied to all or certain events and automatically get updated as you add events, or they can be on a fix daily / weekly or monthly schedule.
Remember that as mentioned before in the 'Combining delivery methods between different items', section, if you want all or certain products in the shopping cart to get bundle together and ask for delivery method only once, as opposed to once per item, all the items should have the exact same set of delivery methods and all the selected delivery methods should have the box ticked to be sharable.
This is probably the expected behavior for all food and beverage items. So make sure all the food and beverage items have the exact same set of delivery methods.
The easiest way to achieve this is by creating an item as template with all the shared data fields and then replicate the template item to create other items.
Then switch to the pictures and videos tab and add pictures and videos for the item. You can use drag and drop to re-order the pictures. The first picture is considered the primary picture and that is the one that shows in the store page.
Note: If you want all cards in the store to have the exact same size, you should make sure all the primary pictures for all items in the store have the same aspect ratio or are the same size.
Then you can go to the details tab and fill out the rest of the item's details including the item description.
Then save the merchandise. And you can create as many merchandise, food or drink using the same method.
5- Duplicating Merchandise
To replicate an item to create a new one, simply edit the item and from the actions menu, duplicate it.
6- Adding Gift Cards
Adding gift cards are very similar to adding merchandise.
You can add as many gift cards, in different amounts and for different occasions, with different pictures.
Silent Auctions & Bidding
To sell an item using silent auction and bidding, create a new merchandise item and set the Sales Mode to Bidding. You can either use the system bidding rules or create a new rule set for your auction. Set the Auction Starting Price, and configure the Auction Date Range to specify when bidding starts and when it ends. Bidding items must have an inventory of one and cannot be reused for future bidding or auctions.
The bidding system supports key features such as minimum bid increments, optional automatic (proxy) bidding, real-time outbid notifications, and secure payment collection from winners. Whether you’re running a charity fundraiser, school auction, gala, or merchandise sale, Silent Auctions on Ticketor make it simple, fair, and fully integrated with your existing ticketing and checkout experience.
This article and video, demonstrates how to create one or more donation pages for different causes so you can collect donations and integrate the donation collection in the purchase fellow to significantly increase the volume of donations and create an integrated ticketing and donation collection system.
Collecting donations is an important function of any non-profit organization but unfortunately most ticketing and registration systems, miss this functionality or do not integrate it correctly into the purchase fellow to make it easy and seamless for the buyer to easily add donation and checkout the donation as well as the tickets and registration in one transaction.
So, many organizations end up creating a separate, not-integrated donation system and the potential donor has to pay for their tickets or registration first, and then proceed to the donation page to make a donation and pay again.
Just imagine you could have asked the buyer if they want to add donation as they are purchasing their tickets and they could have added the donation in one-click and pay all together in one transaction.
Well, Ticketor makes this seamless and with no friction.
Besides that, donors can only pay donations without purchasing tickets or registration.
The donor can also choose to make monthly recurring donations.
Add a Donation (cause) page
You may already have a donation page in your top navigation. If you do, you can simply click on the link in the navigation to go to the page and customize the donation.
Otherwise, or if you want to add more donation causes, go to Control Panel > Account and Settings > Pages and Navigations.
Click on the “Add Item” on the main navigation or as a sub-item of the current navigation items. Then add a “Donation page” and set a title for the page.
Optionally, you can choose to hide the page from the main navigation and only link to the page from the site content or share it from your social media, newsletter or other sites.
If you want the page to show in the navigation, you can use drag & drop to re-order pages.
Click on the link to the donation page to go to the page.
Using this page, donors can read and learn about the cause, choose a pre-set or custom amount to donate and pay for the donation individually or along with other tickets, merchandise or gift-cards that your site offers.
Customize the donation page
When you are on the donation page, click on the gear icon at the top.
It will open a rich text editor, where you can explain your cause, upload pictures and add videos.
It also allows you to define the pre-set values.
Add donation to the purchase flow
To encourage buyers to add donation as part of their purchase, you need to add it to the pre-checkout page.
The donation can either be added to pre-checkout page for certain events (if the donation is related to those events) or it can be added to the pre-checkout page for your site so it is offered as part of the purchase for any event or merchandise.
- To add the donation to certain events, edit the event and from the Details tab > Pre-checkout section, add the donation.
- To add the donation to your whole site, go to Control Panel > Account & Settings > Site Settings > Pre-checkout section and add the donation there.
Note: You can also add other events, merchandise or gift card to the pre-checkout page to promote them.
How does it work for the buyer / donor?
- The buyer / donor, can easily go to the donation page, add a pre-set amount or custom amount to their shopping cart and check it out individually or along with other tickets, merchandise or gift cards.
- If the buyer is purchasing tickets or merchandise, before checking out, the system suggests to them to consider making a donation. The buyer can skip the offer or they can add a pre-set or custom amount to their shopping cart and check them out together with their tickets and merchandise.
Sharing, promoting or adding to a website
When you are on the donation page, you can simply copy the link to that page from the browser’s address-bar.
Then you can share the link on social media, emails, website, etc.
You can also embed the donation page into any website. It can be done as a button, pop-up or embedded as iframe or WordPress shortcode. To do so, use the “Control Panel > Account & Settings > Embed” to get the code to add to your website.
Donor reporting
Use Control Panel > Reports > Donations to review collected donations by invoice. This report uses the sold merchandise report in donation mode, filters to donation / cause items, hides the item-type selector, and shows donation-focused labels while keeping the same column selection, print, and export options.
Use Control Panel > Reports > Donors to list donors by donation / cause, view email and user-card information, compare donation totals between two periods, and see the donor's next upcoming event visit when they hold tickets for a future event. The report supports filters, column selection, print, and export. Admins and report users can see all donors, while event organizers can see donors for their own donation causes only.
To get more information and to view the buyer and admin experience please check out this article
Learn about motivating your sponsors and giving them great value in this link
Gift cards are great tools as:
- They give you cashflow and you receive your money earlier, sometimes months or years earlier
- Your members will give away the cards to non-members and introduce your business to new patrons
- If the buyer does not use the gift card or its full amount, you get free money
Highlights of Ticketor Gift Cards
- You can create gift cards at different values like $50.00 or $100.00 gift cards
- You can offer gift cards for different occasions with different pictures. For example, a gift card for Mother’s Day and another for Valentine’s Day
- You can put the gift cards on sale. For example, you may have you $50.00 gift cards on sales for $45.00
- Buyers can apply multiple gift cards toward their final balance. For example, if the buyer’s total balance is $200, they can use a $50 gift card and a $100 gift card and the $15 remaining balance in another gift card and then pay the remaining balance of $35 using a credit card.
- Gift cards may have remaining balance and can be used in multiple transactions until the remaining balance is Zero. For example, if you have a $50 gift card and you use it in a $20 transaction, the gift card will have $30 balance that can be used for later purchases.
- Gift cards can be redeemed by the buyers online, or by your staff at the point of sale.
- Gift cards can be downloaded or printed after the purchase by the buyer
- Gift cards have a numeric code and a barcode. You can redeem the gift card by entering the numeric code in the gift card box or you can scan the barcode into the box at the point of sale.
- Gift cards do not expire automatically
Creating Gift Cards
Gift cards are a special type of merchandise and can be sold on a store-online type of page.
If you already don’t have a Store page or you want to create a dedicated page for gift cards, use the “Pages and Navigations” item in the “Account and Settings” panel of the “Control Panel” to add a new store page.
You can drag and drop the page to re-order the pages in the navigation area.
Then navigate to the store page.
Note: Gift cards and merchandises can be categorized in a directory or folder structure. If necessary, create categories to put the gift cards in those categories.
Click on add a new gift card button.
Enter a name for the gift card, optionally add a code for easier selection at the point of sale, set the gift card value or the initial balance of the gift card, and the sales price.
The sales price is usually equal to the gift card value but can be lower if the card is on sale.
Add some description and save the gift card.
You can also upload an image to be printed on the card.
Hint: Gift cards can apply to your whole site or they can apply to events by certain event organizers. In other words, event organizers who use your site may offer their own gift cards. If you select an Administrator in the “Event Organizer” box, the gift card will be valid for all the site, otherwise it will only apply to events for that event organizer.
Repeat this process to create as many gift cards at different values and for different occasions.
Hint: You can edit the gift card and change the sales price at any time to have the card on sale for a certain period of time.
Buying a Gift Card
Buyers can simply navigate to your store page, add as many gift cards to their shopping cart, then proceed to checkout and purchase the cards.
They will immediately receive the cards, with the gift card’s name, picture, amount and the gift card code. The code is shown both as a numeric value and also as a scannable barcode and QR code.
They can print the gift cards, or they can download it as an image file and share it with others.
Note: Gift cards can be purchased together with tickets, other merchandise and donations.
Using a Gift Card in a Purchase, Online, by the Buyer
The buyer can add any tickets, merchandise or donations to their shopping cart and proceed to the checkout page.
At the top of the checkout page, they can see their shopping cart, and the total amount due including any service charge or applicable taxes.
They can apply any coupon or promotion code they may have.
Eventually they will see the full remaining balance.
On the gift card box, they can enter the numeric code from the gift card and hit enter.
The system will apply the gift cards full balance to the purchase. The buyer can add as many other gift cards.
The applied gift cards show up as a list.
Clicking on the gift card number, opens up the “View gift card” pop up that shows the actual gift card, the buyer, original amount and remaining balance. The transactions tab shows all the transactions against the gift card.
If the gift cards cover the whole amount of the invoice, the buyer can simply click the reserve button and complete their purchase without any credit card.
If the gift cards are not enough to cover the full invoice amount, the buyer will need to pay the remaining balance using a credit card or PayPal account.
If the applied gift cards are more than the total amount of the invoice, the extra value will remain in the gift card for further purchases.
Using a Gift Card in a Purchase at the Point of Sale
Gift cards can similarly be used in the point of sales page for in-person transactions by your staff.
Your sales staff need to enter the gift card’s numeric code in the gift card box to use the gift card.
They can either manually type in the numeric code into the box or they can use a barcode scanner attached to their device to fill out the gift card number by scanning the barcode or the QR code.
Promoting Gift Cards by Adding Them to the Checkout Flow
Similar to events, donations and merchandise, gift cards can also get added to the pre-checkout page so as the buyers shop on your site, they will be asked to consider purchasing gift cards.
Managing Gift Cards
The admin can view all sold (issued) gift cards and their balances from the Control Panel by clicking on the “Gift Cards” item.
The list shows a list of all sold gift cards, as well as their initial balance and current balance with the ability to search for a card.
Clicking on the gift card, opens up the gift card that shows the actual gift card, initial amount, remaining balance and all the transactions against the gift card.
Accessing the Gift Cards by the Buyer
The buyer can always log in to their account and view their gift cards from the top menu by navigating to “My Gift Cards” menu item.
There they can see their gift cards and the balances and transactions and can print or download the gift card.
To get more information and to view the buyer and admin experience please check out this article
Ticketor supports all type of delivery methods. By default, the system comes with 2 delivery methods.
- Will-Call: Means that the buyer will pick up the tickets at the venue before the event
- e-tickets (print or show on your phone): means that the buyer will either print their tickets or show them on their phone to get admitted.
However, you can define your own delivery methods and associate fees with them. Delivery methods such as different types of mail (post), pick up from a certain location or retail store, ... .
To create or edit delivery methods use Control Panel > Account & Settings > Delivery Methods.
Each event can offer one or more delivery methods. To select delivery methods for an event, edit the event and from the Delivery tab, tick the ones that you want to offer.
e-Tickets
E-ticket is the easiest, most automated and most popular delivery method. As soon as the buyer purchases the tickets, they can print the tickets out or they can show them on their phone. They also receive a confirmation email with a link to their tickets. They can also access their e-tickets by logging in to their account and using the User Menu > Tickets > Print e-tickets
e-Tickets are secured using a hard-to-generate code that is printed on each e-ticket. It is printed in QR code format, barcode format and human readable digits. At the gate, tickets should be validated to make sure they are valid and they are not duplicate (not being used more than once).
All you have to do, is to validate or scan those tickets at the gate. Check out Control Panel > Help & Support > Help & Instructions > Gate Control & E-Ticket Validation for more information.
Will-Call (Venue Pickup or collection)
Another delivery method is will-call where the customer picks up his tickets at a booth at the venue or a designated pick up location before the event. Users who don't have access to a printer may choose this option.
If will-call is offered as the delivery method, you should be prepared to deliver the will-call tickets.
There are 2 methods to deliver will-call tickets:
-
Print and hand out the tickets as the buyer shows up:
You can use the Box Office menu > Find Invoice / Ticket Pickup page to find the invoice by confirmation number, email, invoice number or credit card number. When you hit search, a list of invoices that match your criteria will show up in the list.
The invoices that are set for will-call and are NOT delivered yet, will have a icon. Clicking on the icon, will print the tickets and mark the invoice as delivered.
You can print on a regular paper/printer or you can use thermal printers to print professional tickets.
A receipt will be printed with each invoice, which you can have it signed and keep for your records.
You can also view/edit the invoice using the icon.
-
Print all the will-call tickets in bulk and take to the venue:
On the events date, you can use the Control Panel > Reports > Print Tickets page. Select your event and from the Actions menu, select "Print will-call tickets".
Then you can print all will-call tickets, sorted in alphabetic order. You can print on regular paper/printer or you can use thermal printers to print professional tickets.
A receipt/header with the buyer's information will be printed with each invoice, which you can have it signed and keep for your records.
At this point, you should probably disable the will-call option for the event so more tickets are not sold as will-call.
Mail (post)
You can also offer delivery by mail. You can consult the post office or any mailing service to find the proper mailing options and the fees.
When a ticket is sold that requires shipping, you will get a confirmation email with "(Requires Shipping)" in the subject. However, you should not rely on emails and you should check regularly for the invoices that require shipping.
There are 2 methods to print "mail" tickets:
-
Print and mail the tickets invoice by invoice:
You can use the "Control Panel > Reports > Sales & Invoices" page to see all the recent invoices. Set the date range properly and set the "Shipping" to "Not shipped yet". Then hit the "Refresh" button.
The invoices that require shipping (and are not shipped yet) will show up and they will have a icon. Clicking on the icon, will print the tickets and mark the invoice as "shipped".
You can print on regular paper/printer or you can use thermal printers to print professional tickets.
A header will be printed with each invoice, with the shipping address.
You can also view/edit the invoice using the icon.
-
Print all the "mail" tickets in bulk for certain date range:
You can use the Control Panel > Reports > Print Tickets page. Select your event and from the Actions menu, select "Print mail tickets".
Then you can print all mail tickets, sorted in alphabetic order. You can print on regular paper/printer or you can use thermal printers to print professional tickets.
A header will be printed with each invoice, with the shipping address.
By entering a date/time in the "Tickets sold after" field, you can limit the print to invoices issued after a certain date and so you can ship on a regular basis.
Direct Delivery
Direct delivery is available to admins / sales agents, to be able to sell tickets face-to-face, at the ticket booth or retail location and print the tickets right away and hand them out.
When direct delivery is selected and the buyer's email address is entered, the buyer receives a confirmation email with or without the e-tickets, depending on the setting you specify on Control Panel > Account & Settings > Delivery Methods
Changing Delivery Methods
If you need to change the delivery method of tickets in an invoice, you can edit the invoice and change the delivery methods. Use the "Control Panel > Box Office > Find Invoice / Ticket Pickup" page to see all the recent invoices. Set the date range properly and use other filter options to find the invoice.
Click on icon to edit the invoice. Change the delivery method for each ticket and click on "Update delivery methods".
To get more information and familiarize yourself with the concept please check out this article
This section explains how to validate tickets at the gate and control admission.
Quick Start
Each ticket is issued with one unique code. The same code is printed on the ticket as readable numbers and is also encoded as a QR code and a barcode, so gate staff can scan it or type it manually.
Use Gate Control to scan tickets as guests arrive. A valid ticket is accepted and marked as used. Invalid tickets, refunded tickets, tickets for another event, and duplicate copies of a ticket that was already admitted are rejected.
To scan, go to Control Panel > Events & Venues > Gate Control, or open https://www.Ticketor.com/gate on the scanning phone, tablet, or laptop. You can also install the Ticketor Gate app from Google Play or App Store.
Scan this QR code to open Gate Control:

If the app asks for the website, enter Ticketor.com, then log in with your administrator or gate controller email and password.
Select the event, go to the Camera tab, and scan the ticket QR code or barcode. Watch and listen for the result: an accepted ticket shows a success message and success beep; an invalid or duplicate ticket shows a rejection message and a longer rejection beep.
You can also admit guests by searching their email, phone, name, or confirmation number. If needed, type the ticket code into the Barcode field manually, or use a Bluetooth or USB barcode scanner in keyboard/HID mode so the scanner reads the code and enters it into the box for faster scanning.
For exit and re-entry, switch Gate Control to Exiting mode and scan the guest's ticket as they leave. This removes the entered status so the same ticket can be scanned again when the guest returns. Switch back to Entering mode for normal admission.
Additional Details
To learn about compatible equipment and to purchase one, see Find / Buy Box-Office and Scanning Equipment. To learn about kiosk mode (single app / pinned mode), see Running the Gate Control and POS app in kiosk mode.
How ticket validation works
Gate Control compares each scanned code against the event's valid ticket list and the current scan history.
- Invalid Tickets: Fraudulent tickets, refunded tickets, or tickets for another event or performance.
- Duplicate Tickets: The same ticket printed or copied and used more than once.
After a valid scan, the code is marked as used so duplicate copies cannot be admitted. In Online mode, all gate devices sync with the server so a scan at one gate is reflected at the other gates.
To learn more, read this article.
Validation methods
Method 1: Admission List
For small events with a single gate, print the Admission List from Control Panel > Reports > Admission List. Read each ticket’s numeric code, find it on the list, and check it off.
Method 2: Gate Control on a device
Use a smartphone, tablet, or laptop (the "device") with our scanning app, using either the device camera or an optional Bluetooth/USB barcode scanner.
Access and roles
Log in with an account that has Administrator, Gate Controller, or Event Organizer roles.
- Administrators can scan all events.
- Event Organizers can scan only events they organize.
- Gate Controllers may scan all events or may be restricted to events for certain Event Organizers.
If prompted to allow the website to save data to your device, allow it. This enables loading even without internet.
Scanner and camera notes
Cameras can scan from printed tickets and from the buyer's phone display. QR codes usually scan faster and more reliably than barcodes, so use QR when possible.
External Bluetooth or USB scanners can be faster than a camera. Use a scanner that can read the barcode or QR code and transmit the value as plain text to the device (HID/keyboard mode). 2D scanners read both barcodes and QR codes; 1D scanners read barcodes only.
To test an external scanner, open any app with a text field, activate the field, and scan a ticket. The code should appear as plain text.
Behind the scene / Fast primary result / Emergency network outage
When you open Gate Control, the device downloads the latest valid codes and entry status. Each scan updates your device so it always keeps a current local copy.
Fast validation:Each scan shows an instant primary result using local data (light green/red), then confirms with the server for the final validation and changes the color to darker green/red (final result). On slow networks you can usually rely on the primary result.
Emergency network outage:If the network drops, you can continue scanning using locally stored data. It can validate tickets and detect duplicates to some extent.
Offline validation:
If you do not have reliable internet at the gate, you can use Offline mode with some limitations.
After selecting the event, choose "Offline" as the validation method.
Select the "Number of gates". All devices must use the same value.
Assign each device a gate number (Gate #1, Gate #2, etc.) and label devices accordingly.
With multiple gates in Offline mode, each gate admits only a subset of tickets (a range) to help detect duplicates. Each ticket shows a "G" value (G1 to G10) under the barcode. The system tells you which G values each gate admits. Post signs so guests enter through the correct gate based on their G value.
Click "Download data" to download valid codes to your device.
Notes:
- Download/refresh data after ticket changes are complete. You can keep selling tickets after downloading data.
- Do not reload data after scanning begins, or entry history will be overwritten and duplicates may be missed.
- In Offline mode, returns/refunds should be disabled after downloading data.
Best practice at the gate:
-
For medium and large events, speed is critical. Assign a separate staff member (often with a larger tablet) to handle exceptions so the main line keeps moving.
-
Scanning with one hand: Recommended Bluetooth scanners can attach to the back of a phone. You can use double tape such as Scotch® Reusable Tapes.
Testing with real tickets:
Test scanning by purchasing tickets and later voiding the invoice and returning the tickets, or test with existing orders from the reports.
To un-scan tickets, you have two options:
1- Switch to 'Exit Mode' and scan the same tickets to mark them as not entered.
2- Edit the event and use 'Reset the scan result' from the details tab.
Reporting the scanned tickets:
1- The Control Panel > Reports > Scan Report Shows each ticket and its latest scan time (one row per attendee). If audit records are enabled, it can show all entry/exit scans.
2- The Control Panel > Reports > Sold Tickets report includes a 'Scanned' column showing whether (and when) a ticket was scanned.
Note: By default, only the last scan time is recorded. Enable audit records on the event to record every entry/exit scan and the gate controller user.
It is recommended to run the POS app (page) and Gate control app in Kiosk (single app) mode. While in kiosk mode, the app will be the only app accessible on the device, it will auto-run as soon as you turn on or log in to the device, it will run in full-screen and the app cannot be accidentally closed or sent to background. Also it prevents the gate checker or sales agent to accidentally turn off the Bluetooth or the network connection.
This features may vary a lot depending on your operating system and its version. So in this document we only cover the headlines and you can use simple Google search to find out how to perform that on your device.
Installing the web apps:
The POS page at https://www.Ticketor.com/pos and the Gate control app at https://www.Ticketor.com/gate are designed as browser applications and are compatible with any operating system and modern browser. We recommend you use them in Google Chrome.
When you browse to those pages, the browser will offer you to add the app to home screen. It will install the app in your app drawer or create a shortcut on your home screen so you can launch the app with one click on open it in their own dedicated window without browser extra options.
For gate control, you can instead use the Android or IOS native app called Ticketor Gate that can be downloaded from the store. The browser app and the native app are identical and you can use one or the other.
Running the app in kiosk (pinned) mode:
To find out how to run the app in kiosk mode, Google the solution for your specific operating system. For Android, search for 'pinning an app'. For IOS search for 'Guided Access' or 'Single App Mode'. For Windows 10, search for 'single-app kiosk'.
Ticketor offers a variety of real-time reports that can give you all the information you may need regarding your sales, delivery, financial, etc.. Just login to your site and use the "Reports" section of the Control Panel.
Use Control Panel > Reports > Dashboard for a quick visual overview of recent activity. The dashboard shows sales, orders, tickets sold, refunds, sales trend charts, top events, upcoming event health, and operational items that may need attention. Each chart also includes a data table and links back to the detailed reports.
Each report may offer some filters such as date range, event or user. Set the filters properly and hit the refresh button to update the results. If you need to print the report, just use your browser's "Print" button. Some reports have "Export" options to export the result in Excel.
When you export a report in Excel, some fields may be multi-line and Excel may not show all the lines by default. To fix that, select all the fields in the sheet and from the Home tab at the top of your Excel select "Format > Autofit Row Height".
The date/times in the reports, respect the time zone specifies in your Site Settings. Go to "Control Panel > Account & Settings > Site Settings" and make sure your time zone is set correctly.
When it comes to reporting events and sales, there are basically 2 types of reports. First are the event-specific reports such as Event Statement, Event Audit and Admission List. Second are reports that list all events such as Sales & Invoices and Sold Tickets reports.
Join the Ticketor ad network.
There are 2 options for joining Ticketor ad network. You can select one or both:
Option 1: Promote your events through Ticketor ad network on Ticketor and our partner sites.
Why Use Ticketor Promotions?
- Only pay when you sell. No "Pay per click" charge. No "Pay per view" charge. No in-advance charge and no guess work.
- Pay only a percentage of the sales that you wouldn't make otherwise.
- Reach to new audience and potential customers.
- New customers will get added to your mailing list so you get future sales at no cost.
Option 2: Make money by showing ads on your website.
To join Ticketor ad network for either or both options use "Control Panel > Account & Settings > Site Settings > Ads & Promotions"
Check out the article below to learn about all creative methods Ticketor offer for marketing and advertising your events:
Everything about Marketing, SEO and Advertising Your Events
Coupons and promotion codes let you offer checkout discounts for eligible tickets, packages, event categories, or online store merchandise.
To use this feature, use the Control Panel -> Events & Venues -> Coupons and create a new promotion.
Event: Choose where the coupon applies: all events, one event, a package, or a specific event category. To use a category, edit the applicable events and enter the same category name on each event. Then choose "Specific Category" on the coupon and enter that category name.
Online store merchandise: Use this option when the same coupon should also apply to merchandise, food and drink, or gift cards sold through the online store.
Promotion code: Enter a short, unique code that buyers can enter at checkout. Promotion codes can be up to 25 characters.
Automatically apply this coupon on checkout: If this option is checked, eligible buyers do not have to enter the code. The coupon is applied automatically when the cart meets the coupon rules. Only one promotion code can apply to an invoice.
Promotion type: Choose the discount type: buy-one-get-one, buy-two-get-one, percentage, amount per invoice, or amount per ticket. Percentage and amount discounts require a discount value greater than zero. Buy-one-get-one and buy-two-get-one discounts do not use the discount amount field.
Date range: Fill out the date range when the coupon is valid.
Must buy all the events that this coupon applies to: Use this option when a coupon should apply only if the buyer purchases every event in the selected category or package.
Different-event requirement: Use this option when the buyer must purchase tickets for more than one eligible event, but not necessarily every event.
Minimum and maximum order value: Use these fields to limit the coupon to eligible ticket or item totals within a certain value range.
Minimum and maximum ticket price: Use these fields to limit the coupon to certain ticket prices or ticket types.
Price level / variation matching code: Use this optional restriction when a coupon should apply only to certain ticket types. Enter one or more matching-code fragments separated by commas. The coupon applies to tickets whose price level or selected variation matching code contains one of those fragments, ignoring case. For example, VIP, Gold can match VIP, KidsVIP, SeniorVIP, Gold, or EarlyGold tickets.
Minimum and maximum number of tickets: Use these fields for rules such as group discounts, complimentary-ticket limits, or discounts that apply only up to a certain number of eligible tickets.
Maximum usage: You can limit how many invoices may use the coupon across all buyers. You can also limit how many times each buyer may use the coupon.
Editing a used coupon: If a coupon has already been used on an invoice, you can still edit it. Changes to the discount or who can use the coupon create a new coupon version for future orders and keep the old coupon for past invoices. The old coupon code is renamed with an "old" marker and expired. Other changes update the same coupon directly.
Deleting a coupon: If a coupon has never been used, deleting it removes it. If it has already been used, deleting it archives the coupon instead: the code is renamed with a "del" marker and the coupon is expired for future orders, while past invoices keep their original coupon history.
Adding Promotion Codes To the URL: You can add the promotion code to any URL of your site to make it automatically apply on the checkout page. This allows you to create links or even QR codes with a specific promotion. Simply add the query string coupon=[the promotion word] to your URL.
For example: https://www.Ticketor.com?coupon=friends
Coupon effectiveness report: Use Control Panel > Reports > Coupons to evaluate marketing and promotion-code usage. The report shows each coupon code, how many invoices used it, the number of individual tickets sold on those invoices, the total discount given, and the total amount spent. You can filter it by date range, coupon, and buyer, and you can print or export the results.
You can offer (promote) certain events, merchandise or donation options during the checkout flow, on the pre-checkout page.
The selected items will be offered to the buyer, right before checkout and the buyer is encouraged to consider these items and add to their purchase.
Three types of items may be offered on the pre-checkout page:
- Events
- Merchandise
- Gift Cards
- Donation options
Before adding any of these items to the pre-checkout page, you need to create these items on your Ticketor website.
To add merchandise, you need to add a 'Store Online' page from Control Panel > Account & Settings > Pages & Navigations. Then navigate to the newly added store online page and add your merchandise.
To add donation option(s), you need to add one or more 'Donation' pages from Control Panel > Account & Settings > Pages & Navigations. Then navigate to the newly added donation page and set the donation title, description and default amounts.
The items on the pre-checkout page come from 2 sources:
- Featured, site-wide items: You can select featured items from Control Panel > Account & Settings > Site Settings > Options tab. These items will show up during all purchases regardless of the shopping cart content.
- Event-specific items: These items are specific to an event and only show up if the buyer has tickets to that event in their shopping cart. Event specific items can be added by editing the event and browsing to the details tab.
Pre-checkout page will NOT show up if no item is added to be offered on this page.
This video and article show in more details how to collect donations and increase donation volume as part of your ticket sales or booking
You can use the newsletter feature for multi-channel marketing to send out email, multimedia text messages (MMS / SMS) and push notifications to your patrons.
You can send out emails to the customers that opt-in your mailing list / text list. To use this feature login to your website as admin and go to Control Panel -> Events & Venues -> Mailing List / Text / Push .
Use the Control Panel > Account & Settings > Site Settings > Mailing List and Marketing to configure the newsletter feature and make sure you get proper legal consent from the recipients.
- Messages can be in the form of newsletters, promotional or informational.
- You can send the emails or text messages to all your customers or only the customers who have purchased tickets to a specific event.
- When sending to customers who purchased tickets to a selected event, you can further limit recipients by price level / variation matching code. Enter one or more matching-code fragments separated by commas. The filter matches tickets whose price level or selected variation matching code contains one of those fragments, ignoring case, so VIP can match VIP, KidsVIP, or SeniorVIP.
- You can create templates for emails, text and push notifications that you send out frequently. For example, you can have a template for your weekly newsletter that lists all your upcoming events.
- You can use special tags in the form of [...] in your email templates. These tags will be replaced with the recipient's or event's information. You can get the complete list of valid variables and an example on how to use them on the mailing list page.
- You can send the newsletter right away or schedule it for certain date/time.
- You can use html or text in your emails.
- Always preview your email and send a copy to yourself to make sure everything is as expected before sending out to your customers.
- If you are using html in your email, always send it to yourself first and make sure it looks good in popular email readers like Gmail, Yahoo, Msn, outlook, etc.
- You are not allowed to spam customers. At the bottom of each sent email, there is a link that allows your customer to opt-out (unsubscribe) from your mailing list and not get any more emails from you.
To prevent the recipients from opting-out and to avoid being marked as spammer by email providers, make sure to always send related and useful email and avoid frequent emails.
- Make sure to comply with all the applicable laws when sending out messages. Set the proper, legal consent for collecting emails and phone numbers in Control Panel > Account & Settings > Site Settings
Text (SMS / MMS)
Text marketing has a much higher potential to be viewed and opened by the recipient compared to emails.
However, you should make sure to use it only in compliance with all applicable laws.
Text messages are sent as MMS (multi-media messages) that allows for longer message and attaching a picture. Always test the message to make sure it gets received the way you expect it.
Push Notifications
Push notification pop up in the notification area of mobiles and desktops and when the user clicks / taps on it, it opens the specified link.
Unlike emails and text messages, push notifications are not limited to your registered user list and anybody who visits your website, may subscribe to push notification without signing up or giving away their email or phone number and it is a good opportunity to reach out to more potential clients.
Push notifications cannot be targeted to certain users and cannot be personalized with the recipient's name.
Users can opt out of receiving push notifications from their browser or notification settings and their subscription will automatically expire if they don't visit your website for a long time. As a result, it is important to send regular engaging push notification to make the users to click and visit your site. At that point, we can automatically re-new their subscription so that they will keep receiving the push notifications.
Since the un-subscription happens outside our control, we are not able to determine how many users are going to receive the push notifications.
Reporting (Delivery, Open, Click Rate)
You can report the delivery, open and click rate of your newsletters at Control Panel > Reports > Campaign Stats
View Sent or Scheduled Emails / Deschedule a Newsletter
You can view all previously sent newsletters or emails that are scheduled to be sent from the "Template / Sent History" drop-down menu.
If a newsletter is scheduled but has not been sent yet, you can load the template and click the "Deschedule" button to cancel the scheduled send.
Charges & Quotas
Your plan includes a certain number of free newsletters that you can send to all your patrons per month or per week (based on your plan).
If you exceed your free newsletter quota, the system will clearly show you the applicable charge before you schedule the email. The charge is calculated based on the number of recipients.
Your plan also includes a quota for emails sent to event attendees per event, such as reminder emails or thank-you emails. If you exceed this quota, the system will similarly show you the applicable fee before sending.
Notes:
-
The included quotas are designed to be more than sufficient for most normal marketing and communication needs.
-
The estimated fee shown at the time of scheduling is based on the number of recipients at that moment. The final charge is calculated based on the actual number of recipients at the time the email is sent.
-
For security reasons and to prevent abuse by spammers, you must complete your account setup and have a valid credit card or payment method on file before using the newsletter system.
Creating an Email Template
An email template is the layout and content (usually HTML) that will be used as the body of your newsletter or email message.
Email templates are typically written in HTML, but they must be compatible with email readers (Gmail, Outlook, Apple Mail, etc.).
For best compatibility and security, email templates must not include scripts (JavaScript), embedded forms, or other active content. Most email clients block these anyway.
Videos should not be embedded directly in the email. Instead, use an image thumbnail and link it to the actual video page (for example, YouTube or your website).
You can create your email template directly using the built-in Rich Text Editor.
Alternatively, you can design the email using any external email/template builder or generate one using AI. Create a template using your favorite email or template designer, copy the template as HTML, then in Ticketor's Rich Text Editor click the "< >" (Source) icon in the toolbar to switch to "Source mode", paste your HTML there and save.
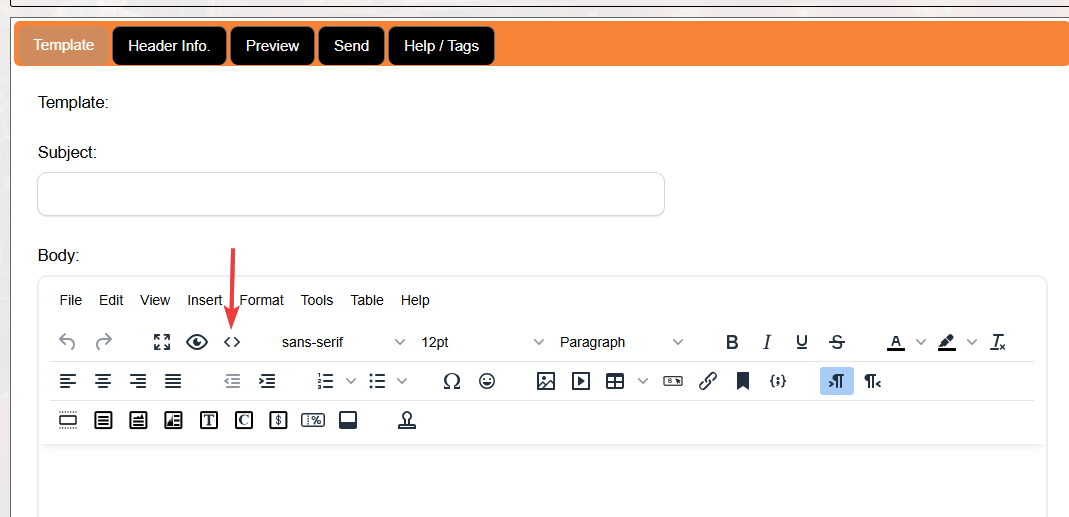
Using Stripo to Create Email Templates
Ticketor has partnered with Stripo, a professional email template builder that makes it easy to design beautiful, responsive email templates.
Go to Stripo.email and either choose one of their pre-built templates or create a new template from scratch.
You can use Ticketor template tags inside your Stripo template, and they will be replaced with actual values when the email is sent.
Once your template is ready, you can transfer it to Ticketor in one of the following ways:
Option 1: Export as HTML
In Stripo, click Export and select File > HTML. Then go to Ticketor’s template editor, click the "<>" (Source) icon in the toolbar, paste the HTML, and save the template.
Option 2: Export directly to Ticketor
In Stripo, click Export, select Email Provider, and choose Ticketor.
In the pop-up window, enter any name for the connection. The username should be your Company ID followed by the email address of a user who has API permission, and the password should be the password of that same user.
To grant API permission to a user, please follow the instructions at: Control Panel > Help & Support > Developers & API
Check out the article below to learn about all creative methods Ticketor offer for marketing and advertising your events:
Everything about Marketing, SEO and Advertising Your Events
You may have sub-promoters who promote your events and may get paid based on their sales amount. Or you may advertise on different media (such as Facebook, Twitter, Google, etc.) or run different digital ads and want to track the return of investment (ROI) for each ad or platform.
Ticketor allows you to create as many "track-able links" for each event or for your website and use the links in your digital ads or give it away to sub-promoters. When a buyer clicks on the link to come to your site and purchases tickets, the purchase will be tracked back to the link and will get associated to the "referrer". Later on, you can pull sales reports based on the referrer.
To create a track-able link for an event, edit the event and go to the "Promote" tab > Track-able links area. Put in a tracking name which could be the name or nickname of a sub-promoter or a code to distinguish the media or Ad.
Some examples of the tracking name could be: John, Mary, Facebook, GoogleAd1, GooglePayPerClick3
Click on the "Generate link" and copy the generated link.
Similarly you can create track-able links for your website (all events) using the following pattern: https://www.Ticketor.com?treferrer=ReferrerName
Reporting the referrer
Event statement: Use the Control Panel > Events & Venues > Event Statement > Report type: Sales by origin, to get the total amount of sales, broken down by referrer.
Referrals Report: Use the Control Panel > Reports > Referrals to get detailed list of sales by referrer
In case you need more analytics and tracking information, you can integrate with Google Analytics. Check out the Control Panel > Help & Support > Help & Instructions > Google Analytics Integration for more information.
Reviews help your business grow and get more customers. It is an essential part and asset of any business. It also allows your customers to voice their satisfactions or dissatisfactions and so improve your overall performance.
In the technology era, reviews are not optional anymore. Customers can review any business on public sites like Google and Yelp, regardless of the business participation in those sites.
Why Ticketor's Reviews is the most fair and friendly reviews system to businesses and how can it improve and protect your business:
While most free review systems like Google or Yelp and some paid systems allow reviews from non-customers and potentially fake or hostile individuals and competitors, and offer no way for the business to dispute a fake or hostile review, Ticketor reviews is fully integrated into your ticketing system and allows reviews only from verified buyers.
The Reviews system will ask and encourage the verified buyers to leave you reviews, while dis-allowing anonymous reviews. The reviews show up on Google and other sites and give you additional credibility.
Our reviews are manageable and you can remove un-wanted reviews at a small fee, to keep the reviews fair.
Having a controllable reviews system will create a place for unhappy customers to express their feedback and frustration and significantly reduces the chances of them leaving you a bad review on public reviews sites that are not controlled by you and the bad reviews will stay with your business forever.
The reviews system can potentially reduce the chance of chargebacks and disputes, by allowing the unsatisfied patron to express their unsatisfaction through the reviews channel.
While most reviews systems come at a considerable monthly fee and do not fully integrate with your ticketing or e-commerce system, our review system is free and fully integrates with your system and events, to only accept reviews for verified buyers and for the events that they actually purchased.
The review request email goes out right at the time of the event for most efficiency and response rate.
What about bad reviews?
While good reviews help grow your business, bad reviews can hurt the business. The rule of thumb in resolving a bad review is to try to contact the reviewer and resolve the issue. Unlike with other review sites where the reviewer is unknown or may be fake, reviewers on Ticketor are your real customers and so you have access to their contact information.
We understand that some reviewers are unreasonable and unfair and not willing to resolve the issue. To make the system fair to the business, you have the option to delete the unfair review permanently.
While Ticketor's Review system is free, deleting a review comes at a fee. The fee is there to ensure that the reviews are as honest and fair as possible.
How much does it cost?
While most reviews systems come at a considerable monthly fee and do not fully integrate with your ticketing or e-commerce system, Ticketor's review system is free and you can opt in or out at any time from "Control Panel > Account & Settings > Site Settings > Reviews"
The fee for deleting a review starts at $35 for the first review that gets deleted in a year, and goes up by $20 for any subsequent review that gets deleted in the one year interval.
Manageable Reviews
'Manageable reviews' is a package that can be added at a monthly fee from Control Panel > Account & Settings > Plans & Features. The package allows you to delete 2 reviews per calendar month at no fee.
Enhanced Reviews
Enhanced Reviews is available for a small monthly fee and it gives you a 2-week window to approve each new or updated review, before they become publicly available.
If you approve the review, it will become publicly available right away. Otherwise, you have 2 weeks to contact the reviewer and resolve the bad review or delete the review.
Enhanced reviews, make sure you get a chance to deal with any potential bad review, before it becomes available to the public.
Set Up Reviews
View / Approve / Delete Reviews
What is Social Media and Facebook Integration and how does it help my business
Integrating your website with social media and Facebook allows you to leverage the power of them to reach to more customers for free.
By adding social media and Facebook to your site:
- You can add a "Tickets" tab to your Facebook page where your fans can get information and start purchasing directly from your Facebook page
- Users can login with their Facebook account for easier access to the site
- Buyers will be encouraged to Share your events on their Facebook, Twitter, Google Plus, LinkedIn, ...
- Facebook ADs pixel will be added for analytics purpose and to enhance your Facebook ADs performance.
How to Integrate with Your Site
You need to create a "Facebook Fan Page" for your business (if you don't already have one)
Associate your Facebook page to your site
- If it is not open, open your site in a new window, login as admin and use the Control Panel -> Account & Settings -> Site Settings and click on Social Media and Facebook
- Click on "Import Facebook Pages". It will open a Facebook dialog and you should confirm the requested permissions.
- Go back to the Control Panel -> Account & Settings -> Site Settings -> Facebook page and select your page in the "Facebook Page" box and hit Save.
- To add a ticketing tab to your Facebook page, similar to the one on Ticketor's Facebook page, click on "Add ticketing to your Facebook page" button. Facebook requires that the page must have at least 2000 likes to be qualified to add a tab.
Your Facebook integration is now complete and your account is connected to Facebook.
Check out the article below to learn about all creative methods Ticketor offer for marketing and advertising your events:
Everything about Marketing, SEO and Advertising Your Events
Users can use Google Sign In / Sign Up to easily sign in to your site with their Google account.
There is no settings required to activate it and your site will use Ticketor's Google App for this purpose. However, for white-label and branding purpose and if you are using Ticketor on your own domain, you may want to create and use your own Google App, with your own branding.
Creating a Google App, Google 'Sign in with Google for web' to find the most recent instruction.
Here is a brief instruction on what needs to be done:
- Go to Google API Console
- Create a new project
- Go to 'OAuth consent screen', select 'External' user type and fill out the form.
- Add the following scopes:openid, /auth/userinfo.profile and /auth/userinfo.email
- Go to 'Credentials' section and create credentials of type 'OAuth client ID'. In the 'Authorized redirect URIs' add https://www.ticketor.com/login?extloginredirect=google
- Set the project to published mode.
- From the 'Credentials' section get the 'Client Id' and 'Client Secret' and put it in the 'Sign In With Google' section of Control Panel > Account & Settings > Site Settings > Google
To switch back to use Ticketor's app, put '[Ticketor's App Id]' in the App Id section.
Google Analytics gives you detailed analytics and stats of your website's traffic. If you want to improve your website traffic, first you should have a good insight of its current state and should be able to monitor the growth or changes.
Google Analytics gives you valuable information about users who visited your site. What country/city are they from? What demographic? From what website did they get to your site? What keywords did they search to find your site? And much more valuable information.
You will need to register for Google Analytics (free) to make use of this feature.
"
Integrating your website with Google Analytics:
- Sign up for a Google Analytics account by going to https://www.google.com/analytics/ or log into an existing Analytics Account
- Click on "Admin" at the top
- Click on "New Account" button
- Enter your site name as the account name and enter the url to your site
- Hit Save
- Click on "A Single Domain" and click save again.
- Get the "Tracking ID" or "Property ID" (UA-xxxxxxxx-x)
- Open your site in a new window, login as admin and go to Control Panel -> Account & Settings -> Site Settings and click on Google Analytics tab.
- Paste the value in the "Web Property ID" field of your site
- Hit Save.
- In a few hours, you will be able to get reports by logging in to your Google Analytics account.
Designing the site means selecting themes and colors for your overall site, uploading a logo and determining design that is going to affect your whole site and all pages.
Using the designer tool in Ticketor, you can create almost any design or site that you may imagine or you can match the site to have the same look and feel as another site or your official site.
Even if you are integrating or embedding ticketing to an existing site, you should still use the designer tool to make the site have the same feel and look as your other site and upload your logos and background pictures.
You can launch the designer tool from Control Panel > Account & Settings > Design . You can follow the wizard for basic settings or skip the Wizard to go to the main panel.
The main panel opens up on your page so you can immediately see the effect of the changes you make on the page. You can navigate to other pages to see the effect on all pages.
All changes to this panel are automatically saved and applied and do not require saving. You can use Ctrl+Z for undoing.
Important note: Usability is More Important Than the Look
The most important consideration when designing a site is usability.
You don’t want to ever sacrifice usability for the sake of design or beauty of your site. Here are a few points you want to pay extra attention to:
- Color contrast: Your text color and background color should have enough contrast to be easily readable, not only by a healthy eye, but also by disabled users.
- Mobile friendliness. Always consider mobile and small display use-cases when designing the site. Try to avoid big paddings and margins around the page that will make the area for the main content so small. Also try to avoid 2 or multi-column designs as they may not fit on small screens as you expect.
With those in mind, lets start designing the site:
Select a Theme
Start by selecting a theme. The theme dictates the overall color of the site. Select a theme that best matches your logo and branding. You can change the colors, backgrounds, borders and other settings for different areas later. So don’t worry if you don’t find a perfect theme. Just select one that uses closest colors to your branding or taste.
Make sure to choose a theme with light text color if you are planning to design a dark-color site and choose a theme with dark text color if you are planning to make a site with light background.
Upload Your Logo
Next, go to the site logo panel and upload your logo. If you do not have a logo, you can use the text logo instead.
The logo as well as the site navigation are the 2 items that reside in the site header area.
You can resize the logo and the top navigation by dragging the handle at the bottom right corner of the them and you can move the logo and the top navigation anywhere in the header area.
You can also adjust the height of the header area by dragging the bottom of the header.
Select Layout and Header Settings
Next select your layout. Consider very large displays as well as very small mobile displays when selecting the layout. Full-width layout may not look good on wide screens. Fix width layout (center) may waste a lot of screen area on big monitors.
I would like to go with “Full-Width with content in the center”. They use all the screen width on small screens and look good on a wide screen.
Depending on whether you want the header and module background colors, that we will adjust in the next steps, to cover the whole width of the screen or only the center, you should select one of the layouts that keep the content in the center.
Also, you can choose the design of the top navigation. You can choose simple links or different style of boxes.
Then you can adjust the alignment of the items in the site header. The site header contains your logo and the top navigation.
You can drag and drop the logo or the top navigation to move them anywhere in the header area. You can resize the logo or the navigation menu using the handle at their bottom-right. If the Navigation menu is too narrow, the items in the nav will wrap to a second line.
You can also adjust the height of the header area by dragging the bottom edge.
Resize your browser to make sure the header area looks good on all screen sizes and widths and it does not cause scrolling.
Upload Ticket Logo
Next upload your e-ticket logo. That is the logo that gets printed on your tickets. Remember that tickets get printed on white papers so the e-ticket logo should have contrast with white.
When you create an event, you can preview the tickets and the e-ticket logo that you upload here.
Upload Email Header and Footer
All the outgoing emails from the system, including welcome emails, confirmation emails, and any newsletter that you send will go out with the email header and footer you upload here.
Note: You can also add email signature from Control Panel > Account & Settings > Edit Emails and Confirmations > Email Signature
Customize Themes and Colors for each Page-Section
At this point you can customize your selected theme, change some colors, borders, or upload background pictures.
Go to the “Sections” tab. This tab includes multiple panels, for different sections of the page. The content of the panels is pretty similar for each section and allow you to customize that section.
Every page on your site consists of the following sections:
- Page: Is the overall page. You can use this section to set a background picture or color for the page and make other settings
- Page Header: The header of the page where your logo and top navigation is located. You can use this section to change the color of the top navigation or change the background of the page header
- Page Footer: Controls the color and design of the site footer. The site footer normally contains the credit card logos and a link to your terms and you can add any content to the site footer from Control Panel > Account and Settings > Edit Content > Site Footer
- Module: Module is the area where the main content of the page is located. For example, “Find Tickets” area, “Shopping Cart” area, “List of events” area, “Contact Us” area are all modules. Each page may contain one or more modules. A module consists of a header and body. The header contains the module title and the body contains the main content of the module. The width of the module may be the full width of the screen or it may be limited to the center area depending on the layout you choose. If you want to have a background picture for the modules that cover the whole width of the screen or if you want the module header to go all the way to the edges of the screen, choose the layout “Full Width – Module content in the center” so only the content of the module (body) is limited to center while the header and module is full-width. Otherwise, if you want the module header to be limited to the center area, choose “Full width – Module in the center” or “Full-width – All content in the center” to limit the site header to the center as well.
- Module Body: Is the part of the module with the main content, excluding the module header (title)
- Module Header: Is the top area of the module with the module title. You can adjust the height of the module header by dragging the bottom edge and you can adjust the font size of the module title or the color and background color.
- Content: This is not a specific area or section of the page but refers to the general content of the page. You can change the main content color and “Highlights & compliments” color that is used as secondary color for titles or highlights of the text.
- Clickables: Here you can set the colors and setting for clickable areas of the page including links, buttons, tabs, and panel headers. You can set the “Default State” or how the clickables look normally, “Hover State” when you hover the mouse over a clickable area, “Active State”, such as the active tab in a panel, “Primary Button” and “Utility Button” colors and styles used throughout the site.
In each panel you can set or overwrite the following settings:
- Background color or style (Solid or gradient). You can choose semi-transparent colors to create see-through areas. For example, you can select a semi-transparent grey or white background color for the module or module body background to make the module area separate from the rest of the page and give enough contrast to your text, while showing your page background image. This technique can be used to create a modern-looking module without borders and boxes
- Background picture that you can upload or select from the gallery
- Border width and color that can be set for each side of the section: top, bottom, left and right. To remove the border for an area that comes default with a border, simply set the border width to zero for all the 4 sides.
- Padding is the blank inner space of the area, between the content of a box and the border of the box. It can be set for each side of the box independently.
- Margin, which is the outer space of the box, from the box border to the next box on the page. It can be set for all 4 sides of the box independently.
- Shadow color and size can set the shadow of the box. If your theme comes with a shadow and you want to remove it, simply set the size to zero.
- Corner radius can be set to create boxes with rounded corner. The corner radius can be set for each corner independently. You can use big radius on some corners to create irregular boxes.
- Font, font color and font shadow allow you to set the font for the section.
Using the Sections tab, you should be able to fully customize the design of your site.
CSS
CSS is a technology used by web designers to design a site. Using CSS, a designer can hide or change the style of every individual item on the page in a very granular or general way.
Since the “Sections” tab of the designer panel give you very good control over the style of the site, it is very unlikely that you need to write any CSS code. Actually, Ticketor discourages using CSS on the site except in very rare cases.
If you are a web developer and decide to use the CSS section to add style to the site, make sure to carefully limit your selectors to the specific item you are targeting and do not use generic selectors to avoid any unexpected consequences that may affect the site functionality.
You can use your Ticketor-based site in different ways.
- You can use it as a stand-alone website and even use it as your official website.
- You can add it as a ticketing section to your existing website.
- You can embed it in your existing website.
If you do not have a website or are not happy with your website, we recommend you consider Ticketor as your official website. Ticketor has many powerful features to build a complete website. You can even move it to your own domain or sub-domain. Check out Control Panel > Help & Support > Help & Instructions > Moving the site to your own domain / sub-domain (white-label) for more information.
However, if using Ticketor for your whole website is not an option, you can use any of the following 3 options (or maybe all of them) that allow you to integrate ticketing into your website and add a ticketing section to it.
- Simple links to ticketing page
- Link exchange (recommended)
- IFrames (must be done with cautions)
Here is what you need to do:
- Design Ticketor with your logo, theme, background image and images to make it have the same feel and look as your other website
- Optionally move Ticketor to a sub-domain of your main domain. If your domain name is MySite.com, you can have Ticketor on Tickets.MySite.com or Events.MySite.com
- If you prefer a quick and simple integration, you can simply create "Tickets" links or buttons on your website and points to a specific event page or your main page at: https://www.Ticketor.com/Events
Deeper Integration
Link Exchange (recommended)
Link exchange is an easy way to make your website and your Ticketor box-office website integrated and seamless at minimum effort.
In this method we create a matching header nav on your Ticketor site and on your website. Some items in the header nav will point to the Ticketor site and some others to your other site. For example, you may have the following links in your header nav:
- Home: Points to your current website (for example: www.mywebsite.com)
- Tickets (or Events): Points to Ticketor website (for example: tickets.mywebsite.com or www.Ticketor.com/MyBusiness)
- About Us: Points to your current website (for example: www.mywebsite.com/about)
You can pick and choose what pages to use from Ticketor and what pages from your website.
- Create the Nav on your site.
- Use Control Panel > Account & Settings > Pages & navigation to create the same navigation menu on your Ticketor site. For items in the nav that point to the other website, use the "Link to other sites" from the drop down.
- Using a similar nav on both websites, users can navigate back and forth between the 2 sites without actually noticing that.
- Optionally, links from different places of your website to Ticketor. You may have links like: "Buy Tickets" that points to the buy tickets page for a specific event or all your events, "Event Information", "Returns policy", etc. can point from your other website to Ticketor.
To get the URL (address) of any page, simply go to the page and copy the address from your browser.
Here are some common pages that you may want to create link to:
And for each event, Ticketor builds 2 pages. One is the event information page and one is the purchase tickets page. You can get each link by simply going to the page and coping the URL from your browser.
Embedding / iframe (must be done with cautions)
You can also insert (embed) any section of your Ticketor site into a page on your other site using IFrames. To do so, simply go to the page on your Ticketor site that you want to embed in your other site. Some potential options are list of all events, or the ticketing page for a specific event.
- Go to the page that you want to use.
- Go to Control Panel > Account & Settings > Embed this page
- Select proper options in the popup and will give you both a link to the section and an iframe to use on any page outside Ticketor
- If you have a WordPress site, then get the shortcode and use the shortcode instead. You will need to download and install Ticketor's WordPress plug-in from: Ticketor.com/WordPress
Warning: Embedding must be done with cautions. The quality of the embedded content is affected by the quality of the page that you embed the code in.
- The embedded iframe can grow or shrink in height depending on the content inside the iframe. Make sure to insert the code inside an element that is not restricted in height and can grow freely otherwise it will end up with double scrollbars and will not function properly.
- Make sure your page is fully responsive and mobile-friendly. If your page is not responsive, the embedded code will not be responsive either.
- Avoid extra margins or paddings on mobile. The embedded area should be able to take the whole width and height of the screen on small mobile devices.
- Always set the links to open "in the parent window" to avoid issues from your website to affect the purchase process. If you decide to set the links to open in the same iframe, make sure to fully test the site and purchase flow on different devices and mobile to make sure your parent page is not breaking the purchase process.
- Users need more features than just purchasing tickets. They may need to login to print or manage their tickets at a later time, or may need to manage their email subscription, cookie preference, password reset, and many more. Make sure your embed solution does not hide this functionality.
This blog and video show you how to more on how to integrate your site with Ticketor or if you should consider replacing it.
Integrating Ticketor with Your Site
Introduction to Ticketor's pages
Your site consists of several pages. Pages on your site are of different origins.
1- Auto-Generated Content Pages
Some of the pages are generated based on the items you add to the site. For example, when you add an event or merchandise, a page is automatically generated for that item. The page is generated with a dedicated, SEO (Search engine) friendly URL (address) that can be posted on social media or messaging apps and can be linked to from other sites or they can be embedded inside other sites or pages.
For example, https://www.ticketor.com/demo/tickets/a-kids-show-1323 is the URL to the dedicated page for the “Kids Show” on our demo site. The URL is very user-friendly and SEO friendly and includes both the name of the site or business, “demo”, and the name of the event, “A Kids Show”.
Note: You can also create a more user-friendly short-link for your events. For example, you can create ticketor.com/demo/KidsShow or YourDomain.com/KidsShow as a short link that is easier to announce, type and remember.
2- Management and Utility Pages
These are the pages that are automatically included in your site, most of them accessible from the top menu and are used by the users to manage their orders and accounts. Pages such as the Checkout page, My account page, My Orders Page, Cookie Manager page, Print My Tickets page, etc.
You cannot add or remove those pages.
3- Custom Content Pages
Custom content pages are the pages that you can add to your site to add content, explanation, and some functionality to your site. Sample of content pages are “List of Events” page, “About Us”, “Contact Us”, “Photo Gallery”, “Our Reviews”, “Donation”, “Landing Pages” or any page with custom textual, graphical or video content.
Adding Pages to Your Ticketor Site and Top Navigation
To add custom pages to your site and to edit the items in your top navigation, use the Control Panel > Account and Settings > Pages and Navigation.
On this page, you can add pages of multiple types, delete the pages that you don’t need or re-order the items in your top navigation.
If there is a page that you don’t need, for example, if you do not have any merchandise or food to sell, then you can simply delete the “Store” page.
You can re-order the items in the top navigation by dragging them around.
The first item in the top nav is considered your home-page and when the users enter the address of your site without specifying any specific page, the homepage is shown.
To add a new page, you can click on the “New Page” item either on the main list of item or you can add a sub-page to any nav item by clicking on the “New Page” in that nav item.
Note: Pages do not have to show up on the top nav and can be removed from the top nav and you can link to them from other areas such as the content of the pages.
New / Edit Page Popup:
The page settings pop-up allows you to add a new page or edit an existing page.
You can select the:
Page type:
Page type determines the type and functionality of the page. Some available options are:
- Tickets / Upcoming Events Page: This is the page that lists all your events and is usually the most important page of your site and the starting point of the purchase. Having a page of this type is highly recommended and the page should be added to the top nav so that users can easily navigate to your events page. If you only have one event you may want to not add and “Upcoming events” page and instead add the link to your only event to the top nav. You can potentially create multiple upcoming events page for different categories of event or for multiple cities. Or you can have one upcoming events for shows and another for classes or other type of events.
- Contact Us Page: This page has a contact form as well as links to your social media. It comes with an FAQ section that can help answer buyers’ question and reduce your customer support effort. This page is also highly recommended.
- Store Page: This page lists your merchandise and gift cards for sale. You may have multiple store pages. For example, one store page for gift cards, another for merchandise, another for food and concession and one for the bar and drinks.
- Donation page is a page to ask for and collect donations. You can create one donation page per causes that you support and the collected donation from each page can potentially go to different bank accounts or reported separately.
- Reviews page is where you can show your user reviews.
- Event organizer sign up page is a page where a user can sign up to become an event organizer on your site and post events. It technically makes the site open to public to post events. If you do not add this page, general public will not be able to post events on your site and only administrators and users who you grant them the event organizer role can create events on the site.
- Galley page is where you can display your pictures and videos organized in albums. The gallery page connects to your Facebook page and shows pictures from selected albums so it is maintenance-free and as you upload pictures in Facebook, they automatically show on the page.
- Free-form page is a blank page that you can add content to it including text, pictures and videos. You can use this type of page to create landing pages, blog, article or any type of custom content.
- Link to Other Pages. This type is not really a page. It is just an item in the top navigation that will link to an internal or external URL. For example, if you only have one event and want to add it in your top nav or make it your homepage, you can add a “Link to other pages” page with the title of the event and the URL that points to the event page. Or if you are integrating Ticketor with an existing site, you can add items to the top nav that point to the other site and so create a matching nav for your Ticketor site, with some items pointing to the other site and some items pointing to your Ticketor site. For example, you can add a “Home” item to the nav, of type “Link to other pages” that links to the homepage of your main site. Similarly, you can add an “Upcoming Events” item in the nav item of your main site, that points to your upcoming events page on Ticketor and so you can create a consistent nav on your main site and Ticketor site, that allows the users to seamlessly navigate between the 2 sites. Another use-case is to integrate a 3rd party site and their features. For example, you can have a link to a 3rd party site that you use for certain purpose.
Menu Text:
Then you can determine if the page is showing in the top nav (menu) or not and if it does, you can set the text.
Page Title:
Each page may have a title that shows in the browser tab and in search engine results. It is recommended to have a relevant, SEO friendly title.
Page Description:
Is used for search engine optimization and may show up on search engines.
Short / Friendly URL:
You can set a friendly URL (address) for the page that is easy to announce, post and remember.
Page Headers:
If you need to add any html headers or meta tags to the page, you can add it here.
Configuring Page:
After adding a page to your site, you can go to the page to configure it or to add or edit the contents.
On the page, depending on the page type, there is usually buttons or icons such as gear icon, pencil icon or settings button to configure that page or functionality.
You can also get and copy the address or URL of the page to link to or post on social media or blog.
This blog and video show you how to add content and pages to your site and top navigation.
Adding Content and Pages to Your Site and Top Navigation
You can edit most of the text and content of your site and add content pages.
Page Content
Most pages, including the upcoming events page, donation page, contact us page and obviously the free form pages have an area that you can add or update the content.
Ticketor uses a powerful editor, also known as rich text editor or Web Editor, to allow you to create any form of content and web pages. You can access the editor using the gear or pencil icon on the page.
The same editor is also used for events or merchandise description or in the newsletter to create email templates.
The editor is very similar to Microsoft Word or any other document editor.
Web Editor – Standard Controls
Using the menu at the top of the editor or the buttons in the toolbar, you can create any type of content.
It allows you to add text (headers and paragraphs) with different colors, fonts, sizes, background colors and with different styles such as bold, Italic or underlined.
You can also align the content to the left, right or center.
You can add lists and bullet points.
You can also add special characters, smileys or choose from 100s of icons.
It also allows you to upload picture or find a stock picture to add to your content.
You can also embed a video that you have uploaded to YouTube, Vimeo, Facebook or other streaming providers.
Tables with as many rows or columns can also be added. They can be used to show tabular data or to create a layout for the content. For example, you can create a 2-column layout, using a table with 2 columns. The border, colors and backgrounds of the table or each cell can be set in the table properties.
You can also add buttons that link to a certain page, such as a “Buy Tickets” button or “Register for Newsletter” button. The buttons control allows you to create buttons of type “Primary” or “Utility” which get their color and style from your theme and match with other buttons on the page or you can create buttons with custom style.
You can also create links. Just select a piece of text or a picture and convert it to a link by adding a URL.
All the items mentioned above are pretty standard in word processor applications and can be used to generate an article or blog.
Web Editor – Web Design Controls
The next set of controls are more of web-design controls and are there so that you can create beautiful web pages.
Section:
The main control in web design controls is “Full width Section”.
Usually, a web page consists of multiple full-width sections or strips stacked on top of each other.
For example, if you look at www.Ticketor.com , the homepage consists of multiple sections including a slide-show, followed by some headlines section, followed by features section, pricing section, testimonials section and reviews section.
Section is actually the container for “Cards” control and allow multiple Card controls to line up horizontally. The cards in the section either scroll or wrap to the next row, depending on the section’s settings.
Start you web design by adding a section. You can set the sections settings, including the background color or picture, border and animation effect. Animation effect will trigger when the section is scrolled into the view.
Cards:
Cards are boxes of information that go into the Section. You can have multiple cards in a row. If the cards don’t fit on the screen, they either wrap to the next row or they will scroll, depending on the section’s settings.
Cards must be inserted into a section. Insert a section, then click inside the section and insert proper cards.
Different types of cards have different layout and can be used for different purposes. Here is a list of cards:
- Generic card, which provides a box
- Vertical card, that contains a picture, text and a button at the bottom
- Horizontal card, with a picture to the left and text to the right
- Profile card, with a profile picture at the top, area for name and title, social media icons and a button
- Text card, that allow you to add some styled text
- Cutout text card, showing a cutout text on a background
- Glowing text card
- Social card with social media icons that can be linked to your social media pages
- Contact us card
- Coupon card, representing a coupon or promotion code
- Counter card, representing a counter on your site
- Google map card, displaying a location on Google map
- Star-Rating card, showing star rating for a product or service out of 5
- Price-Table card, representing a plan or product with its feature
There is also a Site-footer card, suitable for the site footer and a Callout card that shows on the site as a pop up.
One Card can be inserted inside another card to create a more complex layout.
Each card may contain other cards or elements such as images, links, icons, etc. You can click on each element to customize it. For example, a profile card comes with a default picture and social media links and contacts. After adding the card, you can click on the image to change the picture. You can also click on each social media icon to set the URL or you can add icons and links to other social media.
The best way to experience the cards is to create a section and start adding cards of different types to have a better understanding of each card.
To change a card or element properties, simply click anywhere inside the card or element and from the “Tooltip” toolbar, select the card type. If multiple elements are nested inside each other, clicking on one allows you to edit or delete the element or any of its container (parent) elements.
Each element has a group of attributes that allow you to control the size, color, border, animation or other attributes of the element. Web developers can also use the more advanced attributes to add CSS or a Class to the elements.
Templates
The templates icon allows you to add pre-designed section with multiple cards or individual cards. There are templates for the whole section and there are templates for each section item, in case you want to add more items to the section.
Select different templates from the drop down to preview the template.
The templates allow you to quickly and easily create a landing page by adding multiple sections of your choice.
Here are some of the templates:
- Featured products
- Page Header (title)
- Product Detail section
- Counters section
- List section
- Testimonials section
- Our team section
- Product features section / Counters section
- Plans and Pricing Section
- Contact us page
- Videos section
- Blog section
This blog and video show you how to add content and pages to your site and top navigation.
Adding Content and Pages to Your Site and Top Navigation
Your Ticketor site initially has an address like Ticketor.com/[YourName]. Assuming that you own a domain like MyDomain.com, you can move the site to this address and make the site more customized (white-label).
If you already have a site on MyDomain.com that you intend to keep (and not replace with your Ticketor site), you can instead use a sub-domain of your domain for Ticketor. For example, you can have your Ticketor site on Tickets.MyDomain.com, Events.MyDomain.com, or BoxOffice.MyDomain.com
To do so, you need a Premium account.
Step 1
Name-Servers:
Log in to your domain registrar control panel (the company that you purchased the domain from) and set your NAMESERVERS (NS records) to:
- NS1.Ticketor.com
- NS2.Ticketor.com
Remove any other values.
Instruction for a domain (Using GoDaddy or other domain registrars) ex: www.mydomain.com
You need to login to your domain control panel from the company you registered your domain with (for example, GoDaddy), and change your NAMESERVERS to point to NS1.Ticketor.com and NS2.Ticketor.com. Make sure to remove the old values (replace the old values).
Note that by moving your domain, all the potential email addresses that you may have had for the domain will stop working and should be set up here.
Instruction for a sub-domain (Using GoDaddy or other domain registrars) ex: tickets.mydomain.com
- Go to your domain control panel
- Go to the DNS manager where you can edit your Zone file
- Add a NS (nameserver) record. Set “host:” to "tickets.mydomain.com", or just "tickets" and “point to:” to “NS1.Ticketor.com” and “TTL:” to “1 Hour”
- Add another NS record. Set “host:” to "tickets.mydomain.com", or just "tickets" and “point to:” to “NS2.Ticketor.com” and “TTL:” to “1 Hour”
Alternative method for sub-domains
Some domain registrars have limitation and may not allow you to add NS records to your zone file. If that is the case, you can instead add the following CNAME and MX records:
CNAME: tickets.mydomain.com that points to: Ticketor.com
MX: tickets.mydomain.com that points to: mail.Ticketor.com
Step 2
Go to Control Panel > Account & Settings > Site Settings. Click on the 'Move to My Domain' button and follow the steps to move the site to your domain.
In a few minutes after you finalize the setup, your site will be moved to your domain and an SSL certificate will be issued for your domain to make it secure and you can access your site on your own domain or sub-domain.
If after a few minutes, you get a 'Not secure' error message, hit ctrl + F5 or ctrl +Refresh to refresh the certificate. If there are any issues with the process, contact customer support.
All outgoing emails such as sales confirmation, welcome email and newsletters will go out from one of the below addresses from your domain/sub-domain.
Also, you will be able to receive emails at the below addresses. All emails sent to these addresses will get forwarded to your administrator(s) email addresses.
- support@[Your domain or subdomain]
- charges@ [Your domain or subdomain]
- info@ [Your domain or subdomain]
- information@ [Your domain or subdomain]
- orders@ [Your domain or subdomain]
- privacy@ [Your domain or subdomain]
- sales@ [Your domain or subdomain]
Check out Control Panel > Help & Support > Help & Instructions > Use Your Ticketor Email Address(es) for more information on sending and receiving emails.
Notes
- Do not hardcode Ticketor IPs. They may change at any time without notice and your site will become unavailable.
- You may forward your domain to https://www.Ticketor.com but remember that it is very different than the white-label solution mentioned above. With forwarding, buyer can type in your domain name, however, they will see https://www.Ticketor.com in their browser. Also emails go out from Ticketor.com@Ticketor.com
- Do not forward your domain with masking. Masking will keep your domain name in the browser but it will cause the user to not see the https (secure) sign in the address bar and so not feel secure to put in their credit card information. It may also cause confusion for the user or may break some functionalities such as PayPal payment.
- If this solution is not suitable for you, you may consider Control Panel > Help & Support > Help & Instructions > Integrate Ticketor with Your Website
This blog and video show you more on how to move the site to your own domain or sub-domain.
Moving Your Ticketor Site to Your Domain
